![]() HT64
HT64
សៀវភៅណែនាំអ្នកប្រើប្រាស់![]()
![]()

ការប្រុងប្រយ័ត្ន និងវិធានការសុវត្ថិភាព
ឧបករណ៍នេះត្រូវបានរចនាឡើងដោយអនុលោមតាមការណែនាំ IEC/EN61010-1 ដែលទាក់ទងនឹងឧបករណ៍វាស់អេឡិចត្រូនិក។ ដើម្បីសុវត្ថិភាពរបស់អ្នក និងដើម្បីការពារការខូចខាតឧបករណ៍ សូមអនុវត្តតាមនីតិវិធីដែលបានពិពណ៌នានៅក្នុងសៀវភៅណែនាំនេះដោយប្រុងប្រយ័ត្ន ហើយអានកំណត់ចំណាំទាំងអស់ដែលមានមុនដោយនិមិត្តសញ្ញា ![]() ដោយយកចិត្តទុកដាក់បំផុត។
ដោយយកចិត្តទុកដាក់បំផុត។
មុន និងក្រោយពេលធ្វើការវាស់វែង សូមសង្កេតដោយប្រុងប្រយ័ត្ននូវការណែនាំខាងក្រោម៖
- កុំអនុវត្តការវាស់វែងណាមួយនៅក្នុងបរិយាកាសសើម។
- កុំអនុវត្តការវាស់វែងក្នុងករណីមានឧស្ម័ន វត្ថុផ្ទុះ ឬអាចឆេះបាន ឬនៅក្នុងបរិយាកាសមានធូលី។
- ជៀសវាងការទាក់ទងជាមួយសៀគ្វីដែលកំពុងត្រូវបានវាស់ ប្រសិនបើគ្មានការវាស់វែងកំពុងត្រូវបានអនុវត្ត។
- ជៀសវាងការទាក់ទងជាមួយផ្នែកដែកដែលលាតត្រដាង ជាមួយនឹងឧបករណ៍វាស់ស្ទង់ដែលមិនប្រើ សៀគ្វី។ល។
- កុំអនុវត្តការវាស់វែងណាមួយ ក្នុងករណីដែលអ្នករកឃើញភាពមិនប្រក្រតីនៅក្នុងឧបករណ៍ដូចជា ការខូចទ្រង់ទ្រាយ ការបំបែក ការលេចធ្លាយសារធាតុ អវត្តមាននៃការបង្ហាញនៅលើអេក្រង់ជាដើម។
- យកចិត្តទុកដាក់ជាពិសេសនៅពេលវាស់វ៉ុលtagខ្ពស់ជាង 20V ចាប់តាំងពីមានហានិភ័យនៃការឆក់អគ្គិសនី។
នៅក្នុងសៀវភៅដៃនេះ និងនៅលើឧបករណ៍ និមិត្តសញ្ញាខាងក្រោមត្រូវបានប្រើប្រាស់៖
![]() ការព្រមាន៖ សង្កេតមើលការណែនាំដែលមាននៅក្នុងសៀវភៅណែនាំនេះ; ការប្រើប្រាស់មិនត្រឹមត្រូវអាចធ្វើឱ្យខូចឧបករណ៍ ឬសមាសធាតុរបស់វា។
ការព្រមាន៖ សង្កេតមើលការណែនាំដែលមាននៅក្នុងសៀវភៅណែនាំនេះ; ការប្រើប្រាស់មិនត្រឹមត្រូវអាចធ្វើឱ្យខូចឧបករណ៍ ឬសមាសធាតុរបស់វា។
![]() ម៉ែត្រដែលមានអ៊ីសូឡង់ទ្វេ
ម៉ែត្រដែលមានអ៊ីសូឡង់ទ្វេ
![]() វ៉ុលអេស៊ីtagអ៊ី ឬបច្ចុប្បន្ន
វ៉ុលអេស៊ីtagអ៊ី ឬបច្ចុប្បន្ន
![]() វ៉ុលឌីស៊ីtagអ៊ី ឬបច្ចុប្បន្ន
វ៉ុលឌីស៊ីtagអ៊ី ឬបច្ចុប្បន្ន
![]() ការតភ្ជាប់ទៅផែនដី
ការតភ្ជាប់ទៅផែនដី
១.១. ការណែនាំបឋម
- ឧបករណ៍នេះត្រូវបានរចនាឡើងសម្រាប់ប្រើប្រាស់ក្នុងបរិយាកាសបំពុលកម្រិត 2 ។
- វាអាចត្រូវបានប្រើសម្រាប់ VOLTAGការវាស់វែង E និង CURRENT លើការដំឡើងជាមួយ CAT IV 600V និង CAT III 1000V ។
- យើងសូមផ្តល់អនុសាសន៍ឱ្យអនុវត្តតាមច្បាប់សុវត្ថិភាពធម្មតាដែលបង្កើតដោយនីតិវិធីសម្រាប់ប្រតិបត្តិការលើប្រព័ន្ធបន្តផ្ទាល់ និងការប្រើប្រាស់ PPE ដែលបានកំណត់ដើម្បីការពារអ្នកប្រើប្រាស់ពីចរន្តគ្រោះថ្នាក់ និងឧបករណ៍ប្រឆាំងនឹងការប្រើប្រាស់មិនត្រឹមត្រូវ។
- ក្នុងករណីកង្វះការចង្អុលបង្ហាញអំពីវត្តមាននៃវ៉ុលtage អាចតំណាងឱ្យគ្រោះថ្នាក់សម្រាប់ប្រតិបត្តិករ តែងតែអនុវត្តការវាស់វែងបន្តមុនពេលអនុវត្តការវាស់វែងនៅលើប្រព័ន្ធបន្តផ្ទាល់ ដើម្បីបញ្ជាក់ពីការតភ្ជាប់ត្រឹមត្រូវ និងលក្ខខណ្ឌនៃការនាំមុខ។
- មានតែឧបករណ៍នាំមុខដែលផ្គត់ផ្គង់ជាមួយឧបករណ៍ធានាការអនុលោមតាមស្តង់ដារសុវត្ថិភាព។ ពួកគេត្រូវតែស្ថិតក្នុងលក្ខខណ្ឌល្អ និងត្រូវបានជំនួសដោយម៉ូដែលដូចគ្នានៅពេលចាំបាច់។
- កុំសាកល្បងសៀគ្វីលើសពីវ៉ុលដែលបានបញ្ជាក់tage ដែនកំណត់។
- កុំធ្វើតេស្តណាមួយនៅក្រោមលក្ខខណ្ឌបរិស្ថានលើសពីដែនកំណត់ដែលមានចែងក្នុង§ 6.2.1 ។
- ពិនិត្យមើលថាថ្មត្រូវបានបញ្ចូលត្រឹមត្រូវ។
- ត្រូវប្រាកដថាអេក្រង់ LCD និងកុងតាក់បង្វិលបង្ហាញមុខងារដូចគ្នា។
1.2. កំឡុងពេលប្រើប្រាស់
សូមអានដោយប្រុងប្រយ័ត្ននូវការណែនាំ និងការណែនាំខាងក្រោម៖
![]() ប្រយ័ត្ន
ប្រយ័ត្ន
ការខកខានក្នុងការអនុលោមតាមកំណត់ចំណាំប្រុងប្រយ័ត្ន និង/ឬការណែនាំអាចបំផ្លាញឧបករណ៍ និង/ឬសមាសធាតុរបស់វា ឬជាប្រភពគ្រោះថ្នាក់សម្រាប់ប្រតិបត្តិករ។
- មុនពេលបើកដំណើរការកុងតាក់រ៉ូតារីសូមផ្តាច់ការនាំមុខការធ្វើតេស្តពីសៀគ្វីដែលកំពុងត្រូវបានវាស់។
- នៅពេលដែលឧបករណ៍ត្រូវបានភ្ជាប់ទៅសៀគ្វីដែលកំពុងត្រូវបានវាស់សូមកុំប៉ះស្ថានីយដែលមិនប្រើ។
- កុំវាស់ភាពធន់ក្នុងករណីវ៉ុលខាងក្រៅtages មានវត្តមាន; ទោះបីជាឧបករណ៍ត្រូវបានការពារក៏ដោយ វ៉ុលលើសtage អាចបណ្តាលឱ្យដំណើរការខុសប្រក្រតី។
- ខណៈពេលកំពុងវាស់ ប្រសិនបើតម្លៃ ឬសញ្ញានៃបរិមាណដែលកំពុងវាស់វែងនៅតែមិនផ្លាស់ប្តូរ សូមពិនិត្យមើលថាតើមុខងារ HOLD ត្រូវបានបើកឬអត់។
1.3. បន្ទាប់ពីប្រើ
- នៅពេលការវាស់វែងបានបញ្ចប់ សូមកំណត់កុងតាក់បង្វិលទៅ OFF ដើម្បីបិទឧបករណ៍។
- ប្រសិនបើឧបករណ៍មិនត្រូវប្រើរយៈពេលយូរ សូមដកថ្មចេញ។
១.៤. និយមន័យនៃការវាស់វែង (OVERVOLTAGង) ប្រភេទ
ស្តង់ដារ "IEC/EN61010-1: តម្រូវការសុវត្ថិភាពសម្រាប់ឧបករណ៍អគ្គិសនីសម្រាប់ការវាស់វែង ការគ្រប់គ្រង និងការប្រើប្រាស់មន្ទីរពិសោធន៍ ផ្នែកទី 1៖ តម្រូវការទូទៅ" កំណត់ប្រភេទរង្វាស់ដែលជាទូទៅហៅថា លើសវ៉ុល។tagប្រភេទ e, គឺ។ § 6.7.4៖ សៀគ្វីវាស់វែង អាន៖ (OMISSIS)
សៀគ្វីត្រូវបានបែងចែកទៅជាប្រភេទរង្វាស់ដូចខាងក្រោមៈ
- ប្រភេទរង្វាស់ IV គឺសម្រាប់ការវាស់វែងដែលធ្វើឡើងនៅប្រភពនៃវ៉ុលទាបtagការដំឡើងអ៊ី។ ឧamples គឺជាម៉ែត្រអគ្គិសនី និងការវាស់វែងនៅលើឧបករណ៍ការពារចរន្តលើសចំណុះបឋម និងអង្គភាពគ្រប់គ្រងការច្រៀក។
- ប្រភេទការវាស់វែង III គឺសម្រាប់ការវាស់វែងដែលបានអនុវត្តលើការដំឡើងនៅខាងក្នុងអគារ។ ឧamples គឺជារង្វាស់នៅលើបន្ទះចែកចាយ ឧបករណ៍បំលែងសៀគ្វី ខ្សែភ្លើង រួមទាំងខ្សែ រនាំងឡានក្រុង ប្រអប់ប្រសព្វ កុងតាក់ រន្ធ-ព្រីក្នុងការដំឡើងថេរ និងឧបករណ៍សម្រាប់ប្រើប្រាស់ក្នុងឧស្សាហកម្ម និងឧបករណ៍មួយចំនួនទៀត សម្រាប់ឧ.ample, ម៉ូទ័រស្ថានីជាមួយនឹងការតភ្ជាប់អចិន្រ្តៃយ៍ទៅនឹងការដំឡើងថេរ។
- ប្រភេទការវាស់វែង II គឺសម្រាប់ការវាស់វែងដែលធ្វើឡើងនៅលើសៀគ្វីដែលភ្ជាប់ដោយផ្ទាល់ទៅនឹងវ៉ុលទាបtagការដំឡើងអ៊ី។ ឧamples គឺជាការវាស់វែងលើឧបករណ៍ប្រើប្រាស់ក្នុងផ្ទះ ឧបករណ៍ចល័ត និងឧបករណ៍ស្រដៀងគ្នា។
- ប្រភេទការវាស់វែង I គឺសម្រាប់ការវាស់ស្ទង់ដែលបានអនុវត្តនៅលើសៀគ្វីដែលមិនបានភ្ជាប់ដោយផ្ទាល់ទៅកាន់ MAINS ។ ឧamples គឺជារង្វាស់នៅលើសៀគ្វីដែលមិនបានមកពី MAINS និងត្រូវបានការពារជាពិសេស (ខាងក្នុង) សៀគ្វីដែលបានមកពី MAINS ។ ក្នុងករណីចុងក្រោយ ភាពតានតឹងបណ្តោះអាសន្នគឺប្រែប្រួល; សម្រាប់ហេតុផលនោះ ស្តង់ដារតម្រូវឱ្យសមត្ថភាពទប់ទល់បណ្តោះអាសន្នរបស់ឧបករណ៍ត្រូវបានប្រាប់ឱ្យអ្នកប្រើប្រាស់ស្គាល់។
ការពិពណ៌នាទូទៅ
ឧបករណ៍អនុវត្តការវាស់វែងដូចខាងក្រោមៈ
- DC/AC/AC+DC TRMS វ៉ុលtage
- វ៉ុល DC/ACtagអ៊ី ជាមួយ impedance ទាប (LoZ)
- DC/AC/AC+DC TRMS បច្ចុប្បន្ន
- DC / AC / AC + DC TRMS បច្ចុប្បន្នជាមួយ transducer clamps
- ចរន្ត AC, AC + DC TRMS
- ការបង្ហាញ 4-20mA%
- ការធ្វើតេស្តភាពធន់និងភាពជាប់
- ការធ្វើតេស្ត diode
- សមត្ថភាព
- ប្រេកង់
- វដ្តកាតព្វកិច្ច
- សីតុណ្ហភាពជាមួយនឹងការស៊ើបអង្កេតប្រភេទ K
- មុខងារ Data Logger និងបង្ហាញក្រាហ្វនៃទិន្នន័យវាស់វែង
មុខងារទាំងនេះនីមួយៗអាចត្រូវបានជ្រើសរើសដោយមធ្យោបាយនៃកុងតាក់សមស្រប។ ឧបករណ៍នេះក៏ត្រូវបានបំពាក់ដោយគ្រាប់ចុចមុខងារ (សូមមើល§ 4.2) របារអាណាឡូក និងអេក្រង់ LCD TFT ពណ៌កម្រិតពណ៌ខ្ពស់។ ឧបករណ៍នេះត្រូវបានបំពាក់ផងដែរជាមួយនឹងមុខងារបិទដោយស្វ័យប្រវត្តិដែលបិទឧបករណ៍ដោយស្វ័យប្រវត្តិបន្ទាប់ពីពេលវេលាទំនេរជាក់លាក់មួយ (អាចកម្មវិធីបាន)។
២.១. វាស់តម្លៃមធ្យម ANDTRMS តម្លៃ
ឧបករណ៍វាស់បរិមាណឆ្លាស់គ្នាចែកចេញជាពីរគ្រួសារធំៗ៖
- AVERAGE-VALUE ម៉ែត្រ៖ ឧបករណ៍វាស់តម្លៃនៃរលកតែមួយគត់នៅប្រេកង់មូលដ្ឋាន (50 ឬ 60 Hz) ។
- TRMS (True Root Mean Square) VALUE ម៉ែត្រ៖ ឧបករណ៍វាស់តម្លៃ TRMS នៃបរិមាណដែលកំពុងធ្វើតេស្ត។
ជាមួយនឹងរលក sinusoidal យ៉ាងល្អឥតខ្ចោះ ឧបករណ៍ទាំងពីរនេះផ្តល់នូវលទ្ធផលដូចគ្នាបេះបិទ។
ជាមួយនឹងរលកបង្ខូចទ្រង់ទ្រាយ ផ្ទុយទៅវិញ ការអាននឹងខុសគ្នា។ ម៉ែត្រតម្លៃមធ្យមផ្តល់តម្លៃ RMS នៃរលកមូលដ្ឋានតែមួយគត់។ ម៉ែត្រ TRSM ជំនួសវិញ ផ្តល់តម្លៃ RMS នៃរលកទាំងមូល រួមទាំងអាម៉ូនិក (ក្នុងកម្រិតបញ្ជូនឧបករណ៍)។ ដូច្នេះ តាមរយៈការវាស់បរិមាណដូចគ្នាជាមួយនឹងឧបករណ៍ពីគ្រួសារទាំងពីរ តម្លៃដែលទទួលបានគឺដូចគ្នាបេះបិទ លុះត្រាតែរលកគឺ sinusoidal ឥតខ្ចោះ។ ក្នុងករណីដែលវាត្រូវបានបង្ខូចទ្រង់ទ្រាយ TRMS ម៉ែត្រនឹងផ្តល់តម្លៃខ្ពស់ជាងតម្លៃដែលអានដោយម៉ែត្រតម្លៃមធ្យម។
២.២. និយមន័យនៃឫសពិត មានន័យថាតម្លៃការ៉េ និងកត្តា CREST
តម្លៃមធ្យមឫសការ៉េនៃចរន្តត្រូវបានកំណត់ដូចខាងក្រោម៖ "នៅក្នុងពេលវេលាស្មើនឹងរយៈពេលមួយ ចរន្តឆ្លាស់ជាមួយតម្លៃឫសមធ្យមការ៉េនៃអាំងតង់ស៊ីតេ 1A ចរាចរលើរេស៊ីស្តង់ រំសាយថាមពលដូចគ្នា ដែលក្នុងពេលជាមួយគ្នានោះ នឹងត្រូវបានរលាយដោយចរន្តផ្ទាល់ដែលមានអាំងតង់ស៊ីតេ 1A” ។ និយមន័យនេះបណ្តាលឱ្យមានកន្សោមលេខ៖
![]() តម្លៃមធ្យមនៃឫសការ៉េត្រូវបានចង្អុលបង្ហាញដោយអក្សរកាត់ RMS ។
តម្លៃមធ្យមនៃឫសការ៉េត្រូវបានចង្អុលបង្ហាញដោយអក្សរកាត់ RMS ។
កត្តា Crest ត្រូវបានកំណត់ថាជាទំនាក់ទំនងរវាងតម្លៃកំពូលនៃសញ្ញាមួយ និងរបស់វា។
តម្លៃ RMS: CF![]() តម្លៃនេះផ្លាស់ប្តូរជាមួយនឹងទម្រង់រលកសញ្ញា សម្រាប់រលក sinusoidal សុទ្ធសាធ
តម្លៃនេះផ្លាស់ប្តូរជាមួយនឹងទម្រង់រលកសញ្ញា សម្រាប់រលក sinusoidal សុទ្ធសាធ ![]() ក្នុងករណីមានការបង្ខូចទ្រង់ទ្រាយ Crest Factor យកតម្លៃខ្ពស់ជាងនៅពេលដែលការបង្ខូចទ្រង់ទ្រាយរលកកើនឡើង។
ក្នុងករណីមានការបង្ខូចទ្រង់ទ្រាយ Crest Factor យកតម្លៃខ្ពស់ជាងនៅពេលដែលការបង្ខូចទ្រង់ទ្រាយរលកកើនឡើង។
ការរៀបចំសម្រាប់ការប្រើប្រាស់
៣.១. ការត្រួតពិនិត្យបឋម
មុនពេលដឹកជញ្ជូនឧបករណ៍ត្រូវបានត្រួតពិនិត្យពីអគ្គីសនីក៏ដូចជាចំណុចមេកានិចនៃ view. ការប្រុងប្រយ័ត្នដែលអាចកើតមានទាំងអស់ត្រូវបានគេយកទៅ ដើម្បីឱ្យឧបករណ៍ត្រូវបានចែកចាយមិនខូច។ ទោះជាយ៉ាងណាក៏ដោយ យើងសូមណែនាំឱ្យពិនិត្យឧបករណ៍ជាទូទៅ ដើម្បីរកមើលការខូចខាតដែលអាចកើតមានក្នុងអំឡុងពេលដឹកជញ្ជូន។ ក្នុងករណីរកឃើញភាពមិនប្រក្រតី សូមទាក់ទងភ្នាក់ងារបញ្ជូនបន្ត។ យើងក៏សូមផ្តល់អនុសាសន៍ឱ្យពិនិត្យមើលថាការវេចខ្ចប់មានសមាសធាតុទាំងអស់ដែលបានចង្អុលបង្ហាញនៅក្នុង§ 6.3.1 ។ ក្នុងករណីមានភាពខុសគ្នា សូមទាក់ទងអ្នកចែកបៀ។ ក្នុងករណីដែលឧបករណ៍គួរត្រូវបានប្រគល់មកវិញ សូមធ្វើតាមការណែនាំដែលមានក្នុង § 7 ។
៣.២. ឧបករណ៍ផ្គត់ផ្គង់ថាមពល
ឧបករណ៍នេះត្រូវបានបំពាក់ដោយថ្ម Li-ION ដែលអាចសាកបាន 1×7.4V រួមបញ្ចូលក្នុងកញ្ចប់។ នៅពេលដែលថ្មរាបស្មើ និមិត្តសញ្ញា "![]() ” លេចឡើងនៅលើអេក្រង់។ សម្រាប់ការបញ្ចូលថ្ម សូមយោងទៅ§ 6.1 ។
” លេចឡើងនៅលើអេក្រង់។ សម្រាប់ការបញ្ចូលថ្ម សូមយោងទៅ§ 6.1 ។
3.3. ការផ្ទុក
ដើម្បីធានាការវាស់វែងច្បាស់លាស់ ក្រោយពេលរក្សាទុកយូរ រង់ចាំឱ្យឧបករណ៍ត្រឡប់មកសភាពធម្មតាវិញ (សូមមើល§ 7.1.3)។
លំដាប់លេខ
៤.១. ការពិពណ៌នាអំពីឧបករណ៍

ចំណងជើង៖
- អេក្រង់ LCD
- គ្រាប់ចុចមុខងារ F2
- គ្រាប់ចុចមុខងារ F3
- គ្រាប់ចុចមុខងារ F1
- គ្រាប់ចុចមុខងារ F4
- គ្រាប់ចុច RANGE
- គ្រាប់ចុច HOLD/REL
- កុងតាក់ជ្រើសរើសរ៉ូតារី
- ស្ថានីយបញ្ចូល 10A
- ស្ថានីយបញ្ចូល

- ស្ថានីយបញ្ចូល mAuA
- ស្ថានីយបញ្ចូល COM
៤.២. ការពិពណ៌នាអំពីគ្រាប់ចុចមុខងារ
៤.២.១. គ្រាប់ចុច HOLD/REL
ការចុចគ្រាប់ចុច HOLD/REL បង្កកតម្លៃនៃបរិមាណដែលបានវាស់នៅលើអេក្រង់។ បន្ទាប់ពីចុចគ្រាប់ចុចនេះ សារ "សង្កត់" លេចឡើងនៅលើអេក្រង់។ ចុចគ្រាប់ចុច HOLD/REL ម្តងទៀតដើម្បីចេញពីមុខងារ។ ដើម្បីរក្សាទុកវ៉ាល់នៅលើការបង្ហាញសូមមើល§ 4.3.3 ។ ចុចគ្រាប់ចុច HOLD/REL ឱ្យជាប់ក្នុងរយៈពេលយូរដើម្បីបើក/បិទការវាស់វែងដែលទាក់ទង។ ឧបករណ៍នេះសូន្យការបង្ហាញ និងរក្សាទុកតម្លៃដែលបានបង្ហាញជាតម្លៃយោង ដែលការវាស់វែងជាបន្តបន្ទាប់នឹងត្រូវបានសំដៅលើ (សូមមើល§ 4.3.4) ។ និមិត្តសញ្ញា "A" លេចឡើងនៅលើអេក្រង់។ មុខងារនេះមិនសកម្មនៅក្នុងទីតាំងទេ។![]() . ចុចសង្កត់គ្រាប់ចុច HOLD/REL ម្តងទៀតដើម្បីចេញពីមុខងារ។
. ចុចសង្កត់គ្រាប់ចុច HOLD/REL ម្តងទៀតដើម្បីចេញពីមុខងារ។
៤.៣.៣. គ្រាប់ចុច RANGE
ចុចគ្រាប់ចុច RANGE ដើម្បីដំណើរការរបៀបដោយដៃ និងដើម្បីបិទមុខងារ Autorange ។ សារ "សៀវភៅដៃ" លេចឡើងនៅផ្នែកខាងលើខាងឆ្វេងនៃអេក្រង់ជំនួសឱ្យ "AUTO" ។ នៅក្នុងរបៀបដោយដៃ ចុចគ្រាប់ចុច RANGE ដើម្បីផ្លាស់ប្តូរជួរវាស់៖ ចំនុចទសភាគដែលពាក់ព័ន្ធនឹងផ្លាស់ប្តូរទីតាំងរបស់វា។ គ្រាប់ចុច RANGE មិនសកម្មនៅក្នុងមុខតំណែងទេ។![]() Hz%,
Hz%, ![]() . នៅក្នុងរបៀប Autorange ឧបករណ៍ជ្រើសរើសសមាមាត្រសមស្របបំផុតសម្រាប់អនុវត្តការវាស់វែង។ ប្រសិនបើការអានខ្ពស់ជាងតម្លៃអតិបរមាដែលអាចវាស់វែងបាននោះ សូចនាករ "OL" លេចឡើងនៅលើអេក្រង់។ ចុចឱ្យជាប់នឹងគ្រាប់ចុច RANGE លើសពី 1 វិនាទី ដើម្បីចេញពីរបៀបដោយដៃ ហើយស្ដាររបៀបស្វ័យប្រវត្តិឡើងវិញ។
. នៅក្នុងរបៀប Autorange ឧបករណ៍ជ្រើសរើសសមាមាត្រសមស្របបំផុតសម្រាប់អនុវត្តការវាស់វែង។ ប្រសិនបើការអានខ្ពស់ជាងតម្លៃអតិបរមាដែលអាចវាស់វែងបាននោះ សូចនាករ "OL" លេចឡើងនៅលើអេក្រង់។ ចុចឱ្យជាប់នឹងគ្រាប់ចុច RANGE លើសពី 1 វិនាទី ដើម្បីចេញពីរបៀបដោយដៃ ហើយស្ដាររបៀបស្វ័យប្រវត្តិឡើងវិញ។
៤.២.៣. គ្រាប់ចុចមុខងារ F1, F2, F3, F4
ប្រើគ្រាប់ចុច F1, F2, F3 និង F4 ដើម្បីគ្រប់គ្រងមុខងារខាងក្នុងរបស់ឧបករណ៍ (សូមមើល§ 4.3)។
៤.២.៥. មុខងារ LoZ
របៀបនេះអនុញ្ញាតឱ្យអនុវត្តវ៉ុល AC/DCtage ការវាស់វែងជាមួយនឹង impedance បញ្ចូលទាបក្នុងវិធីដើម្បីជៀសវាងការអានខុសដោយសារតែ stray voltage នៅក្នុង capacitive ភ្ជាប់។
![]() ប្រយ័ត្ន
ប្រយ័ត្ន
ការបញ្ចូលឧបករណ៍រវាងដំណាក់កាល និងខ្សែដី ឧបករណ៍ការពារ RCDs អាចនឹងដាច់ចេញក្នុងអំឡុងពេលធ្វើតេស្ត។ សម្រាប់ដំណាក់កាល-PE voltagការវាស់វែង e បន្ទាប់ពីឧបករណ៍ RCD ជាបឋមភ្ជាប់ការធ្វើតេស្តនាំមុខរវាងខ្សែដំណាក់កាល និងអព្យាក្រឹតយ៉ាងហោចណាស់សម្រាប់ 5s បន្ទាប់មកធ្វើការវាស់វែងដំណាក់កាល-PE ដើម្បីជៀសវាងការធ្វើដំណើរដែលមិនរំពឹងទុក។
៤.២.៥. សារ LEAD នៅពេលបង្ហាញ
ពីឧបករណ៍បិទ (បិទ) នៅក្នុង ![]() ទីតាំងសំឡេងខ្លីមួយត្រូវបានបញ្ចេញ ហើយសារ "LEAD" ត្រូវបានបង្ហាញមួយរយៈដើម្បីបង្ហាញពីការណែនាំនៃការប្រើប្រាស់តេស្តនាំមុខសម្រាប់ការវាស់វែងបច្ចុប្បន្ន។
ទីតាំងសំឡេងខ្លីមួយត្រូវបានបញ្ចេញ ហើយសារ "LEAD" ត្រូវបានបង្ហាញមួយរយៈដើម្បីបង្ហាញពីការណែនាំនៃការប្រើប្រាស់តេស្តនាំមុខសម្រាប់ការវាស់វែងបច្ចុប្បន្ន។
៤.៣. ការពិពណ៌នាអំពីមុខងារខាងក្នុង
៤.៣.១. ការពិពណ៌នាអំពីការបង្ហាញ
 ចំណងជើង៖
- ការចង្អុលបង្ហាញអំពីរបៀបស្វ័យប្រវត្តិ / ដោយដៃ
- ការចង្អុលបង្ហាញអំពីពេលវេលានៃប្រព័ន្ធ
- ការចង្អុលបង្ហាញអំពីកម្រិតនៃការសាកថ្ម និងការធ្វើឱ្យសកម្ម/ការបិទសំឡេងគន្លឹះ (មិនទាក់ទងនឹងការធ្វើតេស្តបន្ត)
- ការចង្អុលបង្ហាញអំពីឯកតារង្វាស់
- ការចង្អុលបង្ហាញអំពីលទ្ធផលនៃការវាស់វែង
- របារអាណាឡូក
- ការចង្អុលបង្ហាញដែលភ្ជាប់ជាមួយគ្រាប់ចុចមុខងារ F1, F2, F3, F4
៤.៣.២. វ៉ុល AC+DCtage និងការវាស់វែងបច្ចុប្បន្ន
ឧបករណ៍នេះមានសមត្ថភាពវាស់ស្ទង់វត្តមានដែលអាចកើតមាននៃសមាសធាតុឆ្លាស់គ្នាត្រួតលើគ្នានៅលើវ៉ុលទូទៅtage ឬទម្រង់រលកផ្ទាល់បច្ចុប្បន្ន។ វាអាចមានប្រយោជន៍នៅពេលវាស់សញ្ញាធម្មតានៃបន្ទុកដែលមិនមែនជាលីនេអ៊ែរ (ឧទាហរណ៍ ម៉ាស៊ីនផ្សារ ឡចំហាយអគ្គិសនី។ល។)។
- ជ្រើសរើសទីតាំង
 .
. - ចុចគ្រាប់ចុច F2 ជ្រើសរើស "
 "" ឬ " របៀប” (សូមមើលរូបទី 3)
 - អនុវត្តតាមការណែនាំដែលបង្ហាញក្នុង§ 5.1 ឬ § 5.9
 ៤.៣.៣. មុខងារ HOLD និងការសន្សំ

- ចុចគ្រាប់ចុច HOLD/REL ម្តងទៀតដើម្បីបង្កកលទ្ធផល។ សារ "សង្កត់" លេចឡើងនៅលើអេក្រង់។
- ចុចគ្រាប់ចុច F3 ដើម្បីរក្សាទុកទិន្នន័យនៅក្នុងអង្គចងចាំរបស់ឧបករណ៍។
- បញ្ចូលម៉ឺនុយទូទៅដើម្បីបង្ហាញលទ្ធផលដែលបានរក្សាទុក (សូមមើល§ 4.3.7)
៤.៣.៤. ការវាស់វែងដែលទាក់ទង

- ចុចសង្កត់គ្រាប់ចុច HOLD/REL ដើម្បីបញ្ចូលការវាស់វែងដែលទាក់ទង (សូមមើលរូបទី 5 – ផ្នែកខាងស្តាំ)។ សារ "REL" និងនិមិត្តសញ្ញា "
 "លេចឡើងនៅលើអេក្រង់។
 - ចុចគ្រាប់ចុច F4 ដើម្បីចូលទៅក្នុងម៉ឺនុយទូទៅ រក្សាទុកលទ្ធផលដែលបានវាស់វែង ហើយបង្ហាញវា (សូមមើល§ 4.3.7) ។
៤.៣.៥. រក្សាទុកតម្លៃ MIN/MAX/AVERAGE និង PEAK 
- ចុចគ្រាប់ចុច F4 ដើម្បីចូលទៅក្នុងរបៀបវាស់ MAX, MIN និងតម្លៃមធ្យមនៃបរិមាណដែលត្រូវវាស់ (សូមមើលរូបទី 6 – ផ្នែកកណ្តាល)។ សារ "MAX MIN" លេចឡើងនៅលើអេក្រង់។
- តម្លៃត្រូវបានធ្វើបច្ចុប្បន្នភាពដោយស្វ័យប្រវត្តិដោយឧបករណ៍ដែលបញ្ចេញសំឡេងប៊ីបខ្លីៗនៅពេលដែលតម្លៃដែលបង្ហាញពិតត្រូវបានលើស (ខ្ពស់ជាងសម្រាប់តម្លៃ MAX ទាបសម្រាប់តម្លៃ MIN)។
- ចុចគ្រាប់ចុច F2 ដើម្បីបញ្ឈប់ការរកឃើញតម្លៃ និងគ្រាប់ចុច F1 ដើម្បីចាប់ផ្តើមវាស់ម្តងទៀត។
- ចុចគ្រាប់ចុច F3 ដើម្បីរក្សាទុកលទ្ធផលដែលបានវាស់វែង (សូមមើលរូបភាពទី 6 – ផ្នែកខាងស្តាំ) ហើយបង្ហាញវា (សូមមើល§ 4.3.7) ។

- ចុចគ្រាប់ចុច F4 ដើម្បីចូលទៅក្នុងរបៀបវាស់នៃតម្លៃកំពូលនៃបរិមាណដែលត្រូវវាស់ (សូមមើលរូបភាពទី 7 – ផ្នែកខាងស្តាំ)។ សារ "PEAK" លេចឡើងនៅលើអេក្រង់ ហើយតម្លៃត្រូវបានធ្វើបច្ចុប្បន្នភាពតាមរបៀបដូចគ្នានឹងមុខងារ MAX/MIN ដែរ។
- ចុចគ្រាប់ចុច F2 ដើម្បីបញ្ឈប់ការរកឃើញតម្លៃ និងគ្រាប់ចុច F1 ដើម្បីចាប់ផ្តើមវាស់ម្តងទៀត។
- ចុចគ្រាប់ចុច F3 ដើម្បីរក្សាទុកលទ្ធផល ហើយបង្ហាញវា (សូមមើល§ 4.3.7) ។
៤.៣.៦. ការបង្កើតនិងរក្សាទុកក្រាហ្វនៃការវាស់វែង

- ចុចគ្រាប់ចុច F1 ដើម្បីបញ្ចូលផ្នែកសម្រាប់បង្កើតក្រាហ្វនៃបរិមាណដែលត្រូវវាស់ (សូមមើលរូបទី 8 – ផ្នែកខាងឆ្វេង)។
- ចុចគ្រាប់ចុច F2 (លឿន) ឬ F3 (យឺត) ដើម្បីកំណត់ sampចន្លោះពេលឧបករណ៍នឹងប្រើជាឯកសារយោងនៅពេលបង្កើតក្រាហ្វ។ អ្នកអាចជ្រើសរើសក្នុងចំណោមតម្លៃដូចខាងក្រោម៖ 0.2s, 0.5s, 1.0s, 2.0s, 5.0s, 10s
- ចុចគ្រាប់ចុច F1 ដើម្បីចាប់ផ្តើមបង្កើតក្រាហ្វ។ ជួរវាស់ (បញ្ចូលដោយស្វ័យប្រវត្តិដោយឧបករណ៍) និងតម្លៃពេលវេលាជាក់ស្តែងត្រូវបានបង្ហាញដោយឧបករណ៍ (សូមមើលរូបទី 8 - ផ្នែកកណ្តាល)។
- ចុចគ្រាប់ចុច F4 ដើម្បីបញ្ចប់ក្រាហ្វ។
- ចុចគ្រាប់ចុច F1 ដើម្បីរក្សាទុកក្រាហ្វក្នុងអង្គចងចាំរបស់ឧបករណ៍ ឬគ្រាប់ចុច F4 ដើម្បីចាប់ផ្តើមក្រាហ្វថ្មី (សូមមើលរូបភាពទី 8 – ផ្នែកខាងស្តាំ)។
៤.៣.៧. ម៉ឺនុយឧបករណ៍ទូទៅ
- ជាមួយនឹងការវាស់វែងនៅលើអេក្រង់ (សូមមើលរូបទី 9 – ផ្នែកខាងឆ្វេង) ចុចគ្រាប់ចុចមុខងារ F3 ដើម្បីចូលទៅក្នុងម៉ឺនុយទូទៅរបស់ឧបករណ៍។ អេក្រង់ (សូមមើលរូបទី 9 – ផ្នែកខាងស្តាំ) ត្រូវបានបង្ហាញនៅលើអេក្រង់។
 ការរក្សាទុកការវាស់វែង
 - ចុចគ្រាប់ចុច F1 (ENTER) ដើម្បីរក្សាទុកការវាស់វែង។
ការកត់ត្រាទិន្នន័យ (អ្នកកាប់ឈើ) - ប្រើគ្រាប់ចុច F2 ឬ F3 ដើម្បីជ្រើសរើសនិមិត្តសញ្ញា “កំណត់ត្រា” ហើយចុចគ្រាប់ចុច F1 (សូមមើលរូបទី 10 – ផ្នែកខាងឆ្វេង)។

- ប្រើគ្រាប់ចុច F2 ឬ F3 ដើម្បីជ្រើសរើស៖
➢ ការកំណត់រយៈពេលថតចាប់ពី 1 នាទីដល់ 23 ម៉ោង: 59 នាទី។
➢ ការកំណត់ sampចន្លោះពេលពី 1 ដល់ 59 នាទី: 59 វិនាទី - ចុចគ្រាប់ចុច F1 ដើម្បីបើកមុខងារកែសម្រួល និងគ្រាប់ចុច F2 (+) និង F3 (>>) ដើម្បីអនុវត្តការកំណត់ដែលចង់បាន។
- ចុចគ្រាប់ចុច F1 (យល់ព្រម) ដើម្បីបញ្ជាក់ការកំណត់ ឬគ្រាប់ចុច F4 (CANCEL) ដើម្បីត្រលប់ទៅការកែសម្រួល (សូមមើលរូបភាពទី 10 – ផ្នែកខាងស្តាំ)។
- ចុចគ្រាប់ចុច F4 (CLOSE) ដើម្បីត្រលប់ទៅអេក្រង់មេ
- ជ្រើសរើសជម្រើស "ចាប់ផ្តើមថត" ហើយចុចគ្រាប់ចុច F1 ។ អេក្រង់ខាងក្រោមបង្ហាញនៅលើអេក្រង់

- ឧបករណ៍បង្ហាញពីពេលវេលាដែលនៅសល់ និងចំនួន samples បានថតក្នុងពេលជាក់ស្តែង ហើយសារ “ឈប់” នៅចុងបញ្ចប់នៃការថត (សូមមើលរូបទី 11 – ផ្នែកខាងឆ្វេង)។ ចុចគ្រាប់ចុច F4 (STOP) ដើម្បីបញ្ឈប់ការថតនៅពេលណាក៏បាន។
- ចុចគ្រាប់ចុច F2 ដើម្បីរក្សាទុកទិន្នន័យដែលបានកត់ត្រានៅក្នុងអង្គចងចាំខាងក្នុង និង view វាម្តងទៀតនៅលើការបង្ហាញ
- ចុចគ្រាប់ចុច F3 (TREND) ដើម្បីបង្ហាញនិន្នាការនៃការថត (សូមមើលរូបទី 11 – ផ្នែកកណ្តាល)។
- Press the F4 (>>) key to move the cursor on the graph and the F2 (+) key to activate the Zoom function of the graph, increasing resolution (symbol “Xy” where y=max zoom dimension appears at the top of the display on the right side) (see Fig. 11 – right side). You can zoom X1 for at least 15 measuring points, X2 for at least 30 measuring points, X3 for at least 60 measuring points and so on for maximum 6 zooming operations.
- ចុចគ្រាប់ចុច F4 (BACK) ដើម្បីត្រលប់ទៅអេក្រង់មុន។ ការលុបអង្គចងចាំរបស់ឧបករណ៍
- ប្រើគ្រាប់ចុច F2 ឬ F3 ដើម្បីជ្រើសរើសនិមិត្តសញ្ញា “លុប” ហើយចុចគ្រាប់ចុច F1 (សូមមើលរូបទី 12 – ផ្នែកខាងឆ្វេង)។
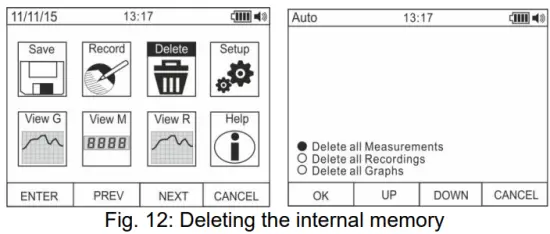
- ប្រើគ្រាប់ចុច F2 ឬ F3 ដើម្បីជ្រើសរើសជម្រើស៖
➢ លុបការវាស់វែងទាំងអស់ → រូបថតទាំងអស់ (ការវាស់វែង) ត្រូវបានលុប
➢ លុបការកត់ត្រាទាំងអស់ → ការថតទាំងអស់ត្រូវបានលុប
➢ លុបក្រាហ្វទាំងអស់ → ក្រាហ្វទាំងអស់ត្រូវបានលុប។ - ចុចគ្រាប់ចុច F1 (យល់ព្រម) ដើម្បីអនុវត្តប្រតិបត្តិការដែលបានជ្រើសរើស (សារបញ្ជាក់ត្រូវបានបង្ហាញដោយឧបករណ៍) ។ ការកំណត់ទូទៅនៃឧបករណ៍
- ប្រើគ្រាប់ចុច F2 ឬ F3 ដើម្បីជ្រើសរើសនិមិត្តសញ្ញា “ដំឡើង” ហើយចុចគ្រាប់ចុច F1 (សូមមើលរូបភាពទី 13 – ផ្នែកខាងឆ្វេង)។

- ប្រើគ្រាប់ចុច F2 ឬ F3 ដើម្បីជ្រើសរើសជម្រើស៖
➢ កំណត់ឡើងវិញ → ស្ដារលក្ខខណ្ឌលំនាំដើមរបស់ឧបករណ៍។
➢ ទម្រង់ → អនុញ្ញាតឱ្យធ្វើឱ្យសម្លេងគន្លឹះសកម្ម ការកំណត់ទម្រង់កាលបរិច្ឆេទ/ពេលវេលា និងលេខដែលបានបង្ហាញ (សញ្ញាក្បៀសទសភាគ ឬចំណុច)។
➢ ទូទៅ → អនុញ្ញាតឱ្យកំណត់កាលបរិច្ឆេទ/ពេលវេលារបស់ប្រព័ន្ធ កំណត់ចន្លោះពេលបិទថាមពលដោយស្វ័យប្រវត្តិ ពណ៌ផ្ទៃខាងក្រោយ និងពណ៌ពុម្ពអក្សរ និងប្រភេទនៃការបង្ហាញ ហើយជ្រើសរើសភាសារបស់ប្រព័ន្ធ។
➢ Meter Info → ផ្តល់ព័ត៌មានអំពីកំណែកម្មវិធីបង្កប់ខាងក្នុង និងនៅលើទំហំទំនេររបស់អង្គចងចាំ។ - ចុចគ្រាប់ចុច F1 (ENTER) ដើម្បីអនុវត្តប្រតិបត្តិការដែលបានជ្រើសរើស ឬគ្រាប់ចុច F4 (CANCEL) ដើម្បីត្រលប់ទៅអេក្រង់វាស់វិញ។ ការកំណត់ទូទៅនៃឧបករណ៍ - កំណត់ឡើងវិញ

- ចុចគ្រាប់ចុច F1 (យល់ព្រម) ដើម្បីដំណើរការការកំណត់ឡើងវិញ។
- ប្រតិបត្តិការកំណត់ឡើងវិញមិនលុបអង្គចងចាំខាងក្នុងរបស់ឧបករណ៍នោះទេ។
ការកំណត់ទូទៅនៃឧបករណ៍ - ទម្រង់
- ប្រើគ្រាប់ចុច F2 ឬ F3 ដើម្បីជ្រើសរើសជម្រើស៖ ➢ សម្លេងគ្រាប់ចុច → អនុញ្ញាតឱ្យធ្វើឱ្យសកម្ម/បិទសម្លេងនៃគ្រាប់ចុចមុខងារ។
➢ ទម្រង់លេខ → អនុញ្ញាតឱ្យកំណត់ទម្រង់នៃលេខដែលបង្ហាញនៅលើការបង្ហាញក្នុងចំណោមជម្រើស៖ 0.000 (ចំណុចទសភាគ) និង 0,000 (សញ្ញាក្បៀស)
➢ ទម្រង់កាលបរិច្ឆេទ → អនុញ្ញាតឱ្យកំណត់ទម្រង់នៃកាលបរិច្ឆេទប្រព័ន្ធរវាងជម្រើស៖ MM/DD/YY និង DD/MM/YY
➢ ទម្រង់ពេលវេលា → អនុញ្ញាតឱ្យកំណត់ទម្រង់នៃពេលវេលាប្រព័ន្ធរវាងជម្រើស៖ - របស់យើង និង 24 ម៉ោង។
- ប្រើគ្រាប់ចុច F1 (កែសម្រួល) និងគ្រាប់ចុច F2 និង F3 សម្រាប់ការកំណត់ ឬគ្រាប់ចុច F4 ដើម្បីត្រឡប់ទៅអេក្រង់មុន។ ការកំណត់ទូទៅនៃឧបករណ៍ - បង្ហាញ

- ប្រើគ្រាប់ចុច F2 ឬ F3 ដើម្បីជ្រើសរើសជម្រើស៖
➢ កំណត់កាលបរិច្ឆេទ → អនុញ្ញាតឱ្យកំណត់កាលបរិច្ឆេទនៃប្រព័ន្ធដូចដែលបានកំណត់ក្នុងម៉ឺនុយទម្រង់។
➢ កំណត់ពេលវេលា → អនុញ្ញាតឱ្យកំណត់ពេលវេលារបស់ប្រព័ន្ធ ដូចដែលបានកំណត់ក្នុងម៉ឺនុយទម្រង់។
➢ ការបិទដោយស្វ័យប្រវត្តិ → អនុញ្ញាតឱ្យកំណត់ចន្លោះពេលបិទដោយស្វ័យប្រវត្តិរបស់ឧបករណ៍ នៅពេលទំនេរក្នុងចន្លោះ៖ 5 នាទី 60 នាទីជាមួយនឹងដំណោះស្រាយ 1 នាទី។ កំណត់តម្លៃ 00 ដើម្បីបិទមុខងារ។ ចុចគ្រាប់ចុច F3 ដើម្បីបើកឧបករណ៍ម្តងទៀត បន្ទាប់ពីវាបានបិទដោយស្វ័យប្រវត្តិ។
➢ ផ្ទៃខាងមុខ → អនុញ្ញាតឱ្យកំណត់ពណ៌ផ្ទៃខាងក្រោយនៃការបង្ហាញ និងពណ៌នៃពុម្ពអក្សរ។
➢ ជ្រើសពុម្ពអក្សរ → អនុញ្ញាតឱ្យកំណត់ប្រភេទនៃពុម្ពអក្សរ ឬការបង្ហាញក្នុងចំណោមជម្រើសដែលមាន (0, 1, 2)។
➢ ភាសា → អនុញ្ញាតឱ្យជ្រើសរើសភាសានៃប្រព័ន្ធក្នុងចំណោមជម្រើស៖ អ៊ីតាលី អង់គ្លេស អេស្ប៉ាញ អាល្លឺម៉ង់ និងបារាំង
ការកំណត់ទូទៅនៃឧបករណ៍ - ព័ត៌មានឧបករណ៍
- ឧបករណ៍បង្ហាញព័ត៌មានដូចខាងក្រោមៈ
➢ កំណែកម្មវិធីបង្កប់ → កំណែកម្មវិធីបង្កប់ខាងក្នុង
➢ អង្គចងចាំឥតគិតថ្លៃ → ភាគរយtage តម្លៃនៃទំហំទំនេរដែលនៅសល់ក្នុងអង្គចងចាំសម្រាប់ការរក្សាទុករូបថត (SAVE) ការថតសំឡេង (REC) និងក្រាហ្វ (GRAPH) ។ - ចុចគ្រាប់ចុច F4 ដើម្បីត្រលប់ទៅអេក្រង់មុន រំលឹកក្រាហ្វទៅអេក្រង់

- ប្រើគ្រាប់ចុច F2 ឬ F3 ដើម្បីជ្រើសរើសនិមិត្តសញ្ញា “View G” ហើយចុចគ្រាប់ចុច F1 (សូមមើលរូបទី 18 – ផ្នែកខាងឆ្វេង)។
- ប្រើគ្រាប់ចុច F2 (PREV) ឬ F3 (NEXT) ដើម្បីជ្រើសរើសក្រាហ្វដែលចង់បានក្នុងចំណោមអ្វីដែលបានរក្សាទុកក្នុងអង្គចងចាំរបស់ឧបករណ៍ ហើយចុចគ្រាប់ចុច F1 (ENTER) ដើម្បីបើកក្រាហ្វ (សូមមើលរូបភាពទី 18 – ផ្នែកកណ្តាល)។
- ប្រើគ្រាប់ចុច F2 (<<) ឬ F3 (>>) ដើម្បីផ្លាស់ទីទស្សន៍ទ្រនិចនៅក្នុងក្រាហ្វក្នុងទិសដៅពីរ ដោយសង្កេតមើលតម្លៃដែលត្រូវគ្នានៅផ្នែកខាងក្រោមនៃអេក្រង់ (សូមមើលរូបភាពទី 18 – ផ្នែកខាងស្តាំ)។
- ចុចគ្រាប់ចុច F1 (DELETE) ដើម្បីលុបក្រាហ្វដែលបានជ្រើសរើស ឬគ្រាប់ចុច F4 (ថយក្រោយ) ដើម្បីត្រឡប់ទៅអេក្រង់មុន។ រំលឹកទិន្នន័យដែលបានវាស់វែង (រូបថត) នៅលើអេក្រង់

- ប្រើគ្រាប់ចុច F2 ឬ F3 ដើម្បីជ្រើសរើសនិមិត្តសញ្ញា “View M” ហើយចុចគ្រាប់ចុច F1 (សូមមើលរូបទី 19 – ផ្នែកខាងឆ្វេង)។
- ប្រើគ្រាប់ចុច F2 (PREV) ឬ F3 (NEXT) ដើម្បីជ្រើសរើស និង view រង្វាស់ដែលចង់បានក្នុងចំណោមឧបករណ៍ដែលបានរក្សាទុកក្នុងអង្គចងចាំរបស់ឧបករណ៍ (សូមមើលរូបទី 19 – ផ្នែកខាងស្តាំ)។ សេចក្តីយោងរង្វាស់បង្ហាញនៅផ្នែកខាងក្រោមនៃការបង្ហាញនៅជ្រុងខាងស្តាំ។
- ចុចគ្រាប់ចុច F1 (DELETE) ដើម្បីលុបរង្វាស់ដែលបានជ្រើសរើស ឬគ្រាប់ចុច F4 (CLOSE) ដើម្បីត្រលប់ទៅអេក្រង់មេ ការរំលឹកឡើងវិញនូវការថតនៅលើអេក្រង់

- ប្រើគ្រាប់ចុច F2 ឬ F3 ដើម្បីជ្រើសរើសនិមិត្តសញ្ញា “View R” ហើយចុចគ្រាប់ចុច F1 (សូមមើលរូប 20 – ផ្នែកខាងឆ្វេង)។
- ប្រើគ្រាប់ចុច F2 (PREV) ឬ F3 (NEXT) ដើម្បីជ្រើសរើសការថតដែលចង់បានក្នុងចំណោមការថតដែលបានរក្សាទុកក្នុងអង្គចងចាំរបស់ឧបករណ៍ (សូមមើលរូបទី 20 – ផ្នែកកណ្តាល)។ ឯកសារយោងនៃការថតបង្ហាញនៅផ្នែកខាងក្រោមនៃអេក្រង់។
- ចុចគ្រាប់ចុច F1 (TREND) ដើម្បីបង្ហាញនិន្នាការនៃការថត។
- ចុចគ្រាប់ចុច F3 (>>) ដើម្បីផ្លាស់ទីទស្សន៍ទ្រនិចនៅលើក្រាហ្វ ហើយសង្កេតមើលតម្លៃដែលត្រូវគ្នានៅខាងក្រោមអេក្រង់។
- ចុចគ្រាប់ចុច F2 (+) ដើម្បីធ្វើសកម្មភាព (ប្រសិនបើមាន) មុខងារពង្រីកក្រាហ្វ។
- ចុចគ្រាប់ចុច F1 (DELETE) ដើម្បីលុបការថតដែលបានជ្រើសរើស ឬគ្រាប់ចុច F4 (BACK) ដើម្បីត្រលប់ទៅអេក្រង់មុន។
ជំនួយនៅលើបន្ទាត់នៅលើអេក្រង់
- ប្រើគ្រាប់ចុច F2 ឬ F3 ដើម្បីជ្រើសរើសនិមិត្តសញ្ញា “ជំនួយ” ហើយចុចគ្រាប់ចុច F1 (សូមមើលរូបភាពទី 21)។
- ប្រើ F2 (UP) ឬ F3 (ចុះក្រោម) ដើម្បីរកមើលទំព័រនៃបរិបទជំនួយតាមអ៊ីនធឺណិត។
- ចុចគ្រាប់ចុច F4 (CLOSE) ដើម្បីត្រលប់ទៅអេក្រង់មេ
ការណែនាំអំពីប្រតិបត្តិការ
៥.១. DC, AC + DC VOLTAGអ៊ី ការវាស់វែង
![]() ប្រយ័ត្ន
ប្រយ័ត្ន
វ៉ុលបញ្ចូលអតិបរមា DCtage គឺ 1000V ។ កុំវាស់វ៉ុលtages លើសពីដែនកំណត់ដែលបានផ្តល់ឱ្យនៅក្នុងសៀវភៅណែនាំនេះ។ លើសពីវ៉ុលtagដែនកំណត់ e អាចបណ្តាលឱ្យមានការឆក់អគ្គិសនីដល់អ្នកប្រើប្រាស់ និងខូចខាតដល់ឧបករណ៍។

- ជ្រើសរើសមុខតំណែង V Hz% ឬ mV
- បញ្ចូលខ្សែក្រហមទៅក្នុងស្ថានីយបញ្ចូល និងខ្សែខ្មៅចូលទៅក្នុងស្ថានីយបញ្ចូល COM ។
- ដាក់ចំនុចនាំមុខពណ៌ក្រហម និងសំណខ្មៅរៀងៗខ្លួននៅក្នុងចំនុចដែលមានសក្តានុពលវិជ្ជមាន និងអវិជ្ជមាននៃសៀគ្វីដែលត្រូវវាស់ (សូមមើលរូបភាពទី 22)។ ការបង្ហាញបង្ហាញពីតម្លៃនៃវ៉ុលtage.
- ប្រសិនបើអេក្រង់បង្ហាញសារ "OL" សូមជ្រើសរើសជួរខ្ពស់ជាងនេះ។
- នៅពេលដែលនិមិត្តសញ្ញា "-" លេចឡើងនៅលើការបង្ហាញឧបករណ៍វាមានន័យថាលេខtage មានទិសដៅផ្ទុយទាក់ទងនឹងការតភ្ជាប់ក្នុងរូបទី 22 ។
- ដើម្បីប្រើមុខងារ HOLD, RANGE និង REL សូមមើល § 4.2 ។
- សម្រាប់ការវាស់វែង AC+DC សូមមើល§ 4.3.2 និងដើម្បីប្រើមុខងារខាងក្នុង សូមមើល§ 4.3។
៤.២. AC VOLTAGអ៊ី ការវាស់វែង
![]() ប្រយ័ត្ន
ប្រយ័ត្ន
វ៉ុលបញ្ចូលអតិបរមា ACtage គឺ 1000V ។ កុំវាស់វ៉ុលtages លើសពីដែនកំណត់ដែលបានផ្តល់ឱ្យនៅក្នុងសៀវភៅណែនាំនេះ។ លើសពីវ៉ុលtagដែនកំណត់ e អាចបណ្តាលឱ្យមានការឆក់អគ្គិសនីដល់អ្នកប្រើប្រាស់ និងខូចខាតដល់ឧបករណ៍។

- ជ្រើសរើសមុខតំណែង V Hz% ឬ mV
- នៅក្នុងទីតាំង mV ចុចគ្រាប់ចុច F2 (MODE) ដើម្បី view និមិត្តសញ្ញា "~" នៅលើអេក្រង់។
- បញ្ចូលខ្សែក្រហមទៅក្នុងស្ថានីយបញ្ចូល
 និងខ្សែខ្មៅចូលទៅក្នុងស្ថានីយបញ្ចូល COM ។
 - ដាក់សំណក្រហម និងសំណខ្មៅរៀងៗខ្លួននៅក្នុងចំនុចនៃសៀគ្វីដែលត្រូវវាស់ (សូមមើលរូបទី 23)។ ការបង្ហាញបង្ហាញពីតម្លៃនៃវ៉ុលtage.
- ប្រសិនបើអេក្រង់បង្ហាញសារ "OL" សូមជ្រើសរើសជួរខ្ពស់ជាងនេះ។
- ចុចគ្រាប់ចុច F2 (MODE) ដើម្បីជ្រើសរើសរង្វាស់ "Hz" ឬ "%" ដើម្បីបង្ហាញតម្លៃនៃប្រេកង់ និងវដ្តកាតព្វកិច្ចនៃវ៉ុលបញ្ចូលtagអ៊ី ចុចគ្រាប់ចុច F1(TRIG) ដើម្បីជ្រើសរើសរលកពាក់កណ្តាលវិជ្ជមាន ឬអវិជ្ជមាននៃមុខងារ “%”របារក្រាហ្វមិនសកម្មនៅក្នុងមុខងារទាំងនេះទេ។
- ដើម្បីប្រើមុខងារ HOLD, RANGE និង REL សូមមើល § 4.2 ។
- ដើម្បីប្រើមុខងារខាងក្នុង សូមមើល§ 4.3
៥.៣. AC/DC VOLTAGការវាស់វែងអ៊ីជាមួយការទប់ទល់ទាប (LOZ)
![]() ប្រយ័ត្ន
ប្រយ័ត្ន
វ៉ុលបញ្ចូលអតិបរមា AC / DCtage គឺ 600V ។ កុំវាស់វ៉ុលtages លើសពីដែនកំណត់ដែលបានផ្តល់ឱ្យនៅក្នុងសៀវភៅណែនាំនេះ។ លើសពីវ៉ុលtagដែនកំណត់ e អាចបណ្តាលឱ្យមានការឆក់អគ្គិសនីដល់អ្នកប្រើប្រាស់ និងខូចខាតដល់ឧបករណ៍។

- ជ្រើសរើសទីតាំង LoZV
 . និមិត្តសញ្ញា "LoZ" និង "DC" ត្រូវបានបង្ហាញ
 - ចុចគ្រាប់ចុច MODE (F2) ដើម្បីជ្រើសរើសការវាស់វែង "AC"
- បញ្ចូលខ្សែក្រហមទៅក្នុងស្ថានីយបញ្ចូល និងខ្សែខ្មៅចូលទៅក្នុងស្ថានីយបញ្ចូល COM
- ដាក់ចំនុចនាំមុខពណ៌ក្រហម និងសំណខ្មៅរៀងៗខ្លួននៅក្នុងចំនុចដែលចង់បាននៃសៀគ្វីដែលត្រូវវាស់ (មើលរូបភាពទី 24) ឬនៅកន្លែងដែលមានសក្តានុពលវិជ្ជមាន និងអវិជ្ជមាននៃសៀគ្វីដែលត្រូវវាស់ (សូមមើលរូបភាពទី 22)។ ការបង្ហាញបង្ហាញពីតម្លៃនៃវ៉ុលtage.
- សារ "OL" បង្ហាញថាតម្លៃនៃវ៉ុល DCtage លើសពីតម្លៃដែលអាចវាស់វែងបានអតិបរមា។
- នៅពេលដែលនិមិត្តសញ្ញា "-" លេចឡើងនៅលើការបង្ហាញឧបករណ៍វាមានន័យថាលេខtage មានទិសដៅផ្ទុយទាក់ទងនឹងការតភ្ជាប់ក្នុងរូបទី 22
- ដើម្បីប្រើមុខងារ HOLD, RANGE និង REL សូមមើល § 4.2
- ដើម្បីប្រើមុខងារខាងក្នុង សូមមើល§ 4.3
៥.៤. រង្វាស់ប្រេកង់ និងកាតព្វកិច្ច
![]() ប្រយ័ត្ន
ប្រយ័ត្ន
វ៉ុលបញ្ចូលអតិបរមា ACtage គឺ 1000V ។ កុំវាស់វ៉ុលtages លើសពីដែនកំណត់ដែលបានផ្តល់ឱ្យនៅក្នុងសៀវភៅណែនាំនេះ។ លើសពីវ៉ុលtagដែនកំណត់ e អាចបណ្តាលឱ្យមានការឆក់អគ្គិសនីដល់អ្នកប្រើប្រាស់ និងខូចខាតដល់ឧបករណ៍។

1. ជ្រើសរើសទីតាំង Hz% ។
2. ចុចគ្រាប់ចុច F2 (MODE) ដើម្បីជ្រើសរើសរង្វាស់ "Hz" ឬ "%" ដើម្បីបង្ហាញតម្លៃនៃប្រេកង់ និងវដ្តកាតព្វកិច្ចនៃវ៉ុលបញ្ចូលtage.
3. បញ្ចូលខ្សែពណ៌ក្រហមទៅក្នុងស្ថានីយបញ្ចូល![]() និងខ្សែខ្មៅចូលទៅក្នុងស្ថានីយបញ្ចូល COM ។
និងខ្សែខ្មៅចូលទៅក្នុងស្ថានីយបញ្ចូល COM ។
4. ដាក់ចំនុចនាំមុខពណ៌ក្រហម និងសំណខ្មៅរៀងៗខ្លួននៅក្នុងចំនុចនៃសៀគ្វីដែលត្រូវវាស់ (សូមមើលរូបភាពទី 25)។ តម្លៃនៃប្រេកង់ (Hz) ឬនៃវដ្តកាតព្វកិច្ច (%) ត្រូវបានបង្ហាញនៅលើអេក្រង់។ bargraph មិនសកម្មនៅក្នុងមុខងារទាំងនេះទេ។
5. ដើម្បីប្រើមុខងារ HOLD និង REL សូមមើល§ 4.2 ។
6. ដើម្បីប្រើមុខងារខាងក្នុង សូមមើល§ 4.3
៥.៥. ការវាស់ស្ទង់ភាពធន់ និងការធ្វើតេស្តបន្ត
![]() ប្រយ័ត្ន
ប្រយ័ត្ន
មុននឹងព្យាយាមវាស់ភាពធន់ សូមកាត់ផ្តាច់ការផ្គត់ផ្គង់ថាមពលពីសៀគ្វីដែលត្រូវវាស់ ហើយត្រូវប្រាកដថា capacitors ទាំងអស់ត្រូវបានរំសាយចេញ ប្រសិនបើមានវត្តមាន។

- ជ្រើសរើសទីតាំង

- បញ្ចូលខ្សែក្រហមទៅក្នុងស្ថានីយបញ្ចូល និងខ្សែខ្មៅចូលទៅក្នុងស្ថានីយបញ្ចូល COM ។
- ដាក់តេស្តនាំមុខនៅកន្លែងដែលចង់បាននៃសៀគ្វីដែលត្រូវវាស់ (សូមមើលរូបទី 26)។ ការបង្ហាញបង្ហាញពីតម្លៃនៃភាពធន់។
- ប្រសិនបើអេក្រង់បង្ហាញសារ "OL" សូមជ្រើសរើសជួរខ្ពស់ជាងនេះ។
- ចុចគ្រាប់ចុច F2 (MODO) ដើម្បីជ្រើសរើសរង្វាស់ )))” ដែលពាក់ព័ន្ធទៅនឹងការធ្វើតេស្តបន្ត ហើយកំណត់ទីតាំងតេស្តនាំមុខនៅក្នុងចំនុចដែលចង់បាននៃសៀគ្វីដែលត្រូវវាស់។
- តម្លៃនៃភាពធន់ (ដែលគ្រាន់តែជាការចង្អុលបង្ហាញ) ត្រូវបានបង្ហាញជា 2 ហើយឧបករណ៍ស្តាប់ទៅប្រសិនបើតម្លៃនៃភាពធន់ទ្រាំគឺ <50Ω
- ដើម្បីប្រើមុខងារ HOLD, RANGE និង REL សូមមើល § 4.2 ។
- ដើម្បីប្រើមុខងារខាងក្នុង សូមមើល§ 4.3 ។
៤.៦. តេស្ត DIODE
![]() ប្រយ័ត្ន
ប្រយ័ត្ន
មុននឹងព្យាយាមវាស់ភាពធន់ សូមកាត់ផ្តាច់ការផ្គត់ផ្គង់ថាមពលពីសៀគ្វីដែលត្រូវវាស់ ហើយត្រូវប្រាកដថា capacitors ទាំងអស់ត្រូវបានរំសាយចេញ ប្រសិនបើមានវត្តមាន។

- ជ្រើសរើសទីតាំង
- ចុចគ្រាប់ចុច F2 (MODE) ដើម្បីជ្រើសរើសការវាស់វែង "+" ។
- បញ្ចូលខ្សែក្រហមទៅក្នុងស្ថានីយបញ្ចូល និងខ្សែខ្មៅចូលទៅក្នុងស្ថានីយបញ្ចូល COM ។
- ដាក់ចំនុចនាំមុខនៅខាងចុងនៃ diode ដែលត្រូវធ្វើតេស្ត (សូមមើលរូបភាពទី 27) ដោយគោរពតាមបន្ទាត់រាងប៉ូលដែលបានចង្អុលបង្ហាញ។ តម្លៃនៃកម្រិតបន្ទាត់រាងប៉ូលដោយផ្ទាល់ voltage ត្រូវបានបង្ហាញនៅលើអេក្រង់។
- ប្រសិនបើតម្លៃកម្រិតស្មើនឹង OmV នោះប្រសព្វ PN នៃ diode ត្រូវបានកាត់ខ្លី។
- ប្រសិនបើអេក្រង់បង្ហាញសារ "OL" នោះស្ថានីយនៃ diode ត្រូវបានបញ្ច្រាសដោយគោរពទៅនឹងការចង្អុលបង្ហាញដែលមាននៅក្នុងរូបភាពទី 27 ឬប្រសព្វ PN នៃ diode ត្រូវបានខូចខាត។
- ដើម្បីប្រើមុខងារ HOLD និង REL សូមមើល§ 4.2 ។
- ដើម្បីប្រើមុខងារខាងក្នុង សូមមើល§ 4.3 ។
៥.៧. ការវាស់វែងសមត្ថភាព
![]() ប្រយ័ត្ន
ប្រយ័ត្ន
មុនពេលអនុវត្តការវាស់ស្ទង់សមត្ថភាពនៅលើសៀគ្វី ឬ capacitors សូមកាត់ផ្តាច់ការផ្គត់ផ្គង់ថាមពលចេញពីសៀគ្វីដែលកំពុងត្រូវបានសាកល្បង ហើយអនុញ្ញាតឱ្យ capacitance ទាំងអស់នៅក្នុងវាត្រូវបានរំសាយចេញ។ នៅពេលភ្ជាប់ multimeter និង capacitance ដែលត្រូវវាស់ សូមគោរពបន្ទាត់រាងប៉ូលត្រឹមត្រូវ (នៅពេលចាំបាច់) ។

- ជ្រើសរើសទីតាំង
- ចុចគ្រាប់ចុច F2 (MODE) រហូតដល់និមិត្តសញ្ញា "nF" ត្រូវបានបង្ហាញ។
- បញ្ចូលខ្សែក្រហមទៅក្នុងស្ថានីយបញ្ចូល និងខ្សែខ្មៅចូលទៅក្នុងស្ថានីយបញ្ចូល COM ។
- ចុចគ្រាប់ចុច REL/A មុនពេលធ្វើការវាស់វែង។
- កំណត់ទីតាំងនាំមុខនៅចុងនៃ capacitor ដែលត្រូវធ្វើតេស្តដោយគោរព បើចាំបាច់ ប៉ូលវិជ្ជមាន (ខ្សែក្រហម) និងអវិជ្ជមាន (ខ្សែខ្មៅ) (សូមមើលរូបភាពទី 28) ។ ការបង្ហាញបង្ហាញពីតម្លៃ។ អាស្រ័យលើ capacitance ឧបករណ៍អាចចំណាយពេលប្រហែល 20s មុនពេលបង្ហាញតម្លៃចុងក្រោយត្រឹមត្រូវ។ bargraph មិនសកម្មនៅក្នុងមុខងារនេះទេ។
- សារ "OL" បង្ហាញថាតម្លៃនៃ capacitance លើសពីតម្លៃអតិបរមាដែលអាចវាស់វែងបាន។
- ដើម្បីប្រើមុខងារ HOLD និង REL សូមមើល§ 4.2 ។
- ដើម្បីប្រើមុខងារខាងក្នុង សូមមើល§ 4.3 ។
៥.៨. ការវាស់សីតុណ្ហភាពជាមួយ K-type PROBE
![]() ប្រយ័ត្ន
ប្រយ័ត្ន
មុនពេលព្យាយាមវាស់សីតុណ្ហភាព សូមកាត់ផ្តាច់ការផ្គត់ផ្គង់ថាមពលពីសៀគ្វីដែលត្រូវវាស់ ហើយត្រូវប្រាកដថា capacitors ទាំងអស់ត្រូវបានរំសាយចេញ ប្រសិនបើមានវត្តមាន។

- ជ្រើសរើសទីតាំង

- ចុចគ្រាប់ចុច F2 (MODE) រហូតដល់និមិត្តសញ្ញា “°C” ឬ “F” ត្រូវបានបង្ហាញ។
- បញ្ចូលអាដាប់ទ័រដែលបានផ្តល់ទៅក្នុងស្ថានីយបញ្ចូល (polarity +) និង COM (polarity -) (សូមមើលរូប 29)
- ភ្ជាប់ការស៊ើបអង្កេតខ្សែប្រភេទ K ដែលបានផ្តល់ឱ្យ ឬឧបករណ៍កម្តៅប្រភេទ K ស្រេចចិត្ត (សូមមើល§ 7.2.2) ទៅនឹងឧបករណ៍ដោយមធ្យោបាយនៃអាដាប់ទ័រ ដោយគោរពតាមប៉ូលវិជ្ជមាន និងអវិជ្ជមាននៅលើវា។ ការបង្ហាញបង្ហាញពីតម្លៃនៃសីតុណ្ហភាព។ bargraph មិនសកម្មនៅក្នុងមុខងារនេះទេ។
- សារ "OL" បង្ហាញថាតម្លៃនៃសីតុណ្ហភាពលើសពីតម្លៃអតិបរមាដែលអាចវាស់វែងបាន។
- ដើម្បីប្រើមុខងារ HOLD និង REL សូមមើល§ 4.2 ។
- ដើម្បីប្រើមុខងារខាងក្នុង សូមមើល§ 4.3 ។
៥.៩. ការវាស់វែងបច្ចុប្បន្ន DC, AC+DC និងការអាន E 4-20MA%
![]() ប្រយ័ត្ន
ប្រយ័ត្ន
ចរន្តបញ្ចូលអតិបរមា DC គឺ 10A (បញ្ចូល 10A) ឬ 600mA (បញ្ចូល mAuA)។ កុំវាស់ចរន្តលើសពីដែនកំណត់ដែលមាននៅក្នុងសៀវភៅណែនាំនេះ។ លើសពីវ៉ុលtagដែនកំណត់ e អាចបណ្តាលឱ្យមានការឆក់អគ្គិសនីដល់អ្នកប្រើប្រាស់ និងខូចខាតដល់ឧបករណ៍។

- កាត់ផ្តាច់ការផ្គត់ផ្គង់ថាមពលពីសៀគ្វីដែលត្រូវវាស់។
- ជ្រើសរើសទីតាំង µA, mA ឬ 10A 20mA សម្រាប់ 4-20mA
 ការអាន។ ដើម្បីវាស់ចរន្ត DC ឬទីតាំងដូចគ្នា 4-
 - បញ្ចូលខ្សែក្រហមទៅក្នុងស្ថានីយបញ្ចូល 10A ឬចូលទៅក្នុងស្ថានីយបញ្ចូល mAµA ហើយខ្សែខ្មៅចូលទៅក្នុងស្ថានីយបញ្ចូល COM ។
- ភ្ជាប់ការនាំមុខពណ៌ក្រហម និងសំណខ្មៅជាស៊េរីទៅសៀគ្វីដែលអ្នកចង់វាស់ចរន្តដោយគោរពតាមបន្ទាត់រាងប៉ូល និងទិសដៅបច្ចុប្បន្ន (សូមមើលរូបភាពទី 30)។
- ផ្គត់ផ្គង់សៀគ្វីដែលត្រូវវាស់។
- តម្លៃនៃចរន្ត DC (សូមមើលរូបភាពទី 30 – ផ្នែកខាងឆ្វេង) បង្ហាញនៅលើអេក្រង់។
- តម្លៃនៃការអាន 4-20mA% (0mA = -25%, 4mA = 0%, 20mA = 100% និង 24mA = 125%) (សូមមើលរូបទី 30 ផ្នែកខាងស្តាំ) លេចឡើងនៅលើការបង្ហាញ។ bargraph មិនសកម្មនៅក្នុងមុខងារនេះទេ។
- ប្រសិនបើអេក្រង់បង្ហាញសារ "OL" តម្លៃដែលអាចវាស់វែងបានអតិបរមាត្រូវបានឈានដល់។
- នៅពេលដែលនិមិត្តសញ្ញា “-” លេចឡើងនៅលើការបង្ហាញរបស់ឧបករណ៍ វាមានន័យថាចរន្តមានទិសដៅផ្ទុយទាក់ទងនឹងការភ្ជាប់នៅក្នុងរូបភាពទី 30 ។
- ដើម្បីប្រើមុខងារ HOLD, RANGE និង REL សូមមើល § 4.2 ។
- សម្រាប់ការវាស់វែង AC+DC សូមមើល§ 4.3.2 និងដើម្បីប្រើមុខងារខាងក្នុង សូមមើល§ 4.3
៥.១០. ការវាស់វែងបច្ចុប្បន្ន AC
![]() ប្រយ័ត្ន
ប្រយ័ត្ន
ចរន្តបញ្ចូលអតិបរមារបស់ AC គឺ 10A (បញ្ចូល 10A) ឬ 600mA (បញ្ចូល mAuA)។ កុំវាស់ចរន្តលើសពីដែនកំណត់ដែលមាននៅក្នុងសៀវភៅណែនាំនេះ។ លើសពីវ៉ុលtagដែនកំណត់ e អាចបណ្តាលឱ្យមានការឆក់អគ្គិសនីដល់អ្នកប្រើប្រាស់ និងខូចខាតដល់ឧបករណ៍។

- កាត់ផ្តាច់ការផ្គត់ផ្គង់ថាមពលពីសៀគ្វីដែលត្រូវវាស់។
- ជ្រើសរើសមុខតំណែងμΑ, mA ឬ 10A
- ចុចគ្រាប់ចុច F2 (MODE) ដើម្បីជ្រើសរើសការវាស់វែង "AC" ។
- បញ្ចូលខ្សែក្រហមទៅក្នុងស្ថានីយបញ្ចូល 10A ឬចូលទៅក្នុងស្ថានីយបញ្ចូល mAµA ហើយខ្សែខ្មៅចូលទៅក្នុងស្ថានីយបញ្ចូល COM ។
- ភ្ជាប់សំណក្រហម និងសំណខ្មៅជាស៊េរីទៅសៀគ្វីដែលអ្នកចង់វាស់ចរន្ត (សូមមើលរូបទី 31)។
- ផ្គត់ផ្គង់សៀគ្វីដែលត្រូវវាស់។ ការបង្ហាញបង្ហាញពីតម្លៃនៃចរន្ត។
- ប្រសិនបើអេក្រង់បង្ហាញសារ "OL" តម្លៃដែលអាចវាស់វែងបានអតិបរមាត្រូវបានឈានដល់។
- ដើម្បីប្រើមុខងារ HOLD, RANGE និង REL សូមមើល § 4.2 ។
- ដើម្បីប្រើមុខងារខាងក្នុង សូមមើល§ 4.3
៥.១១. DC, AC, AC + DC ការវាស់វែងបច្ចុប្បន្នជាមួយ Transducer CLAMPS
![]() ប្រយ័ត្ន
ប្រយ័ត្ន
- ការវាស់វែងបច្ចុប្បន្នអតិបរមានៅក្នុងមុខងារនេះគឺ 3000A AC ឬ 1000A DC ។ កុំវាស់ចរន្តលើសពីដែនកំណត់ដែលមាននៅក្នុងសៀវភៅណែនាំនេះ។
- ឧបករណ៍ធ្វើរង្វាស់ដោយប្រើឧបករណ៍ប្តូរដែលអាចបត់បែនបានទាំងពីរ clamp (គ្រឿងបន្លាស់ស្រេចចិត្ត F3000U) និង cl ស្តង់ដារផ្សេងទៀត។amp ឧបករណ៍ប្តូរនៃគ្រួសារ HT ។ សម្រាប់ transducer clamps ជាមួយឧបករណ៍ភ្ជាប់ទិន្នផល HT គឺចាំបាច់ អាដាប់ទ័រស្រេចចិត្ត NOCANBA ដើម្បីដំណើរការការតភ្ជាប់

- ជ្រើសរើសទីតាំង

- ចុចគ្រាប់ចុច F2 (MODE) ដើម្បីជ្រើសរើស "AC", "DC" ឬ "AC + DC" ការវាស់វែង
- ចុច RANGE key ដើម្បីជ្រើសរើសនៅលើឧបករណ៍ដែលមានជួរដូចគ្នាដែលបានកំណត់នៅលើ transducer clamp ក្នុងចំណោមជម្រើស: 1000mA, 10A, 30A, 40A (សម្រាប់តែ HT4006) 100A, 300A, 400A (សម្រាប់តែ HT4006), 1000A, 3000A ។ ជួរដែលបានជ្រើសរើសបង្ហាញនៅផ្នែកខាងឆ្វេងផ្នែកខាងលើនៃអេក្រង់
- បញ្ចូលខ្សែក្រហមទៅក្នុងស្ថានីយបញ្ចូល និងខ្សែខ្មៅចូលទៅក្នុងស្ថានីយបញ្ចូល COM ។ សម្រាប់ឧបករណ៍ប្តូរស្តង់ដារផ្សេងទៀត (សូមមើល§) ជាមួយឧបករណ៍ភ្ជាប់ HT ប្រើគ្រឿងបន្លាស់ស្រេចចិត្ត NOCANBA ។ សម្រាប់ព័ត៌មានអំពីការប្រើប្រាស់ឧបករណ៍បំប្លែង clamps យោងទៅសៀវភៅណែនាំអ្នកប្រើប្រាស់ដែលទាក់ទង
- បញ្ចូលខ្សែនៅខាងក្នុងថ្គាម (សូមមើលរូបភាពទី 32) ។ តម្លៃនៃចរន្តលេចឡើងនៅលើអេក្រង់
- ប្រសិនបើអេក្រង់បង្ហាញសារ "OL" តម្លៃដែលអាចវាស់វែងបានអតិបរមាត្រូវបានឈានដល់
- ដើម្បីប្រើមុខងារ HOLD, RANGE និង REL សូមមើល § 4.2
- ដើម្បីប្រើមុខងារខាងក្នុង សូមមើល§ 4.3
ថែទាំ
![]() ប្រយ័ត្ន
ប្រយ័ត្ន
- មានតែអ្នកជំនាញ និងអ្នកបច្ចេកទេសដែលបានទទួលការបណ្តុះបណ្តាលប៉ុណ្ណោះដែលគួរធ្វើប្រតិបត្តិការថែទាំ។ មុនពេលអនុវត្តប្រតិបត្តិការថែទាំ សូមផ្តាច់ខ្សែទាំងអស់ចេញពីស្ថានីយបញ្ចូល។
- កុំប្រើឧបករណ៍ក្នុងបរិយាកាសដែលមានកម្រិតសំណើមខ្ពស់ ឬសីតុណ្ហភាពខ្ពស់។ កុំប៉ះពាល់នឹងពន្លឺព្រះអាទិត្យដោយផ្ទាល់។
- បិទឧបករណ៍ជានិច្ចបន្ទាប់ពីប្រើ។ ក្នុងករណីដែលឧបករណ៍មិនត្រូវប្រើរយៈពេលយូរ សូមដកថ្មចេញ ដើម្បីជៀសវាងការលេចធ្លាយសារធាតុរាវដែលអាចបំផ្លាញសៀគ្វីខាងក្នុងរបស់ឧបករណ៍។
៦.១. ការបញ្ចូលថ្មខាងក្នុងឡើងវិញ
នៅពេលដែល LCD បង្ហាញនិមិត្តសញ្ញា " ![]() ", វាចាំបាច់ក្នុងការបញ្ចូលថ្មខាងក្នុង។
", វាចាំបាច់ក្នុងការបញ្ចូលថ្មខាងក្នុង។

- ដាក់កុងតាក់បង្វិលទៅបិទ ហើយដកខ្សែចេញពីស្ថានីយបញ្ចូល។
- បញ្ចូលអាដាប់ទ័រនៃការផ្គត់ផ្គង់ថាមពលឆ្នាំងសាកថ្មទៅក្នុងឧបករណ៍ ចូលទៅក្នុងស្ថានីយបញ្ចូលទាំងបួន (សូមមើលរូបភាពទី 33)។
- បញ្ចូលឧបករណ៍ភ្ជាប់នៃការផ្គត់ផ្គង់ថាមពលទៅក្នុងអាដាប់ទ័រហើយភ្ជាប់ការផ្គត់ផ្គង់ថាមពលទៅនឹងមេអគ្គីសនី។
- និមិត្តសញ្ញាភ្លឹបភ្លែតៗនៃថ្មពណ៌បៃតងលេចឡើងនៅលើអេក្រង់។ ដំណើរការបញ្ចូលថ្មត្រូវបានបញ្ចប់នៅពេលដែលនិមិត្តសញ្ញាមានស្ថិរភាព។
- ផ្តាច់ឧបករណ៍សាកថ្មចេញពីឧបករណ៍ នៅពេលប្រតិបត្តិការបានបញ្ចប់។
 ប្រយ័ត្ន
ប្រសិនបើដំណើរការសាកថ្មមិនដំណើរការទេ សូមពិនិត្យមើលភាពសុចរិតនៃហ្វុយហ្ស៊ីបការពារ F800mA/1000V (សូមមើល§ 7.1.2) ហើយជំនួសវាប្រសិនបើចាំបាច់ (សូមមើល§ 6.2)
៦.២. ការជំនួស FUSES ខាងក្នុង

- ដាក់កុងតាក់បង្វិលទៅបិទ ហើយដកខ្សែចេញពីស្ថានីយបញ្ចូល។
- បង្វិលវីសភ្ជាប់នៃគម្របប្រអប់ថ្មពីទីតាំង
 ហើយយកវាចេញ (សូមមើលរូប 34)
 ទៅទីតាំង
 - ដោះហ្វុយហ្ស៊ីបដែលខូច ហើយបញ្ចូលហ្វុយស៊ីបថ្មីនៃប្រភេទដូចគ្នា (សូមមើល§ 7.1.2)។
- ស្តារគម្របប្រអប់ថ្មឱ្យនៅនឹងកន្លែង ហើយបង្វែរវីសភ្ជាប់ពីទីតាំង ទៅទីតាំង .
៦.៣. ការសម្អាតឧបករណ៍
ប្រើក្រណាត់ទន់ និងស្ងួត ដើម្បីសម្អាតឧបករណ៍។ កុំប្រើក្រណាត់សើម សារធាតុរំលាយ ទឹក ។ល។
៦.៣. ចុងបញ្ចប់នៃជីវិត
![]() ព្រមាន៖ និមិត្តសញ្ញានៅលើឧបករណ៍បង្ហាញថាឧបករណ៍ និងគ្រឿងបន្សំរបស់វាត្រូវតែត្រូវបានប្រមូលដោយឡែកពីគ្នា និងបោះចោលឱ្យបានត្រឹមត្រូវ។
ព្រមាន៖ និមិត្តសញ្ញានៅលើឧបករណ៍បង្ហាញថាឧបករណ៍ និងគ្រឿងបន្សំរបស់វាត្រូវតែត្រូវបានប្រមូលដោយឡែកពីគ្នា និងបោះចោលឱ្យបានត្រឹមត្រូវ។
លក្ខណៈបច្ចេកទេស
៥.៣. លក្ខណៈបច្ចេកទេស
ភាពត្រឹមត្រូវគណនាជា [%reading + (num. digits*resolution)] នៅ 18°C 28°C <75%HR
ឌីស៊ីវ៉ុលtage
| ជួរ | ដំណោះស្រាយ | ភាពត្រឹមត្រូវ | ការបញ្ចូល impedance | ការការពារប្រឆាំងនឹងការលើស |
| 600.0mV | 0.1mV | ±(0.1% ការអាន + 5 ខ្ទង់) | > 10 មេហ្គាវ៉ាត់ | 1000VDC / ACrms |
| 6.000V | 0.001V | |||
| 60.00V | 0.01V | |||
| 600.0V | 0.1V | ±(0.2% ការអាន + 5 ខ្ទង់) | ||
| 1000V | 1V |
AC TRMS វ៉ុលtage
| ជួរ | ដំណោះស្រាយ | ភាពត្រឹមត្រូវ (*) | ការការពារប្រឆាំងនឹងការលើស | |
| (50Hz ± 60Hz) | (61Hz ± 1kHz) | |||
| 600.0mV | 0.1mV | ±(0.9% ការអាន + 5 ខ្ទង់) | ±(3.0% ការអាន + 5dgt) | 1000VDC / ACrms |
| 6.000V | 0.001V | |||
| 60.00V | 0.01V | |||
| 600.0V | 0.1V | |||
| 1000V | 1V | |||
(*) ភាពត្រឹមត្រូវដែលបានបញ្ជាក់ពី 10% ទៅ 100% នៃជួររង្វាស់, ឧបសគ្គបញ្ចូល:> 9M ;
មុខងារ PEAK ភាពត្រឹមត្រូវ៖ ±(10%rdg + 30dgt), ពេលវេលាឆ្លើយតប PEAK៖ 1ms
សម្រាប់មិនមែនជាទម្រង់រលក sinusoidal ភាពត្រឹមត្រូវគឺ: (10.0% ការអាន + 10dgt)
AC + DC TRMS វ៉ុលtage
| ជួរ | ដំណោះស្រាយ | ភាពត្រឹមត្រូវ (*) (50Hz¸1kHz) | ការបញ្ចូល impedance | ការការពារប្រឆាំងនឹងការលើស |
| 6.000V | 0.001V | ±(3.0% ការអាន + 20dgt) | > 10 មេហ្គាវ៉ាត់ | 1000VDC / ACrms |
| 60.00V | 0.01V | |||
| 600.0V | 0.1V | |||
| 1000V | 1V |
(*) ភាពត្រឹមត្រូវដែលបានបញ្ជាក់ពី 10% ទៅ 100% នៃជួររង្វាស់
សម្រាប់មិនមែនជាទម្រង់រលក sinusoidal ភាពត្រឹមត្រូវគឺ: (10.0% ការអាន + 10dgt)
DC/AC TRMS វ៉ុលtagអ៊ី ជាមួយ impedance ទាប (LoZ)
| ជួរ | ដំណោះស្រាយ | ភាពត្រឹមត្រូវ (*) (50Hz¸1kHz) | ការបញ្ចូល impedance | ការការពារប្រឆាំងនឹងការលើស |
| 6.000V | 0.001V | ±(3.0% អាន+40dgt) | ប្រហែល 3 kW | 600VDC / ACrms |
| 60.00V | 0.01V | |||
| 600.0V | 0.1V | |||
| 600V | 1V |
(*) ភាពត្រឹមត្រូវដែលបានបញ្ជាក់ពី 10% ទៅ 100% នៃជួររង្វាស់
សម្រាប់មិនមែនជាទម្រង់រលក sinusoidal ភាពត្រឹមត្រូវគឺ: (10.0% ការអាន + 10dgt)
ចរន្ត DC
| ជួរ | ដំណោះស្រាយ | ភាពត្រឹមត្រូវ | ការការពារ ប្រឆាំង ថ្លៃលើស |
| 600.0 mA | 0.1 mA | ±(0.9% ការអាន + 5 ខ្ទង់) | ហ្វុយហ្ស៊ីបរហ័ស 800mA / 1000V |
| 6000 mA | 1 mA | ||
| 60.00 mA | 0.01 mA | ||
| 600.0 mA | 0.1 mA | ±(0.9% ការអាន + 8 ខ្ទង់) | |
| 10.00A | 0.01A | ±(1.5% ការអាន + 8 ខ្ទង់) | ហ្វុយស៊ីបរហ័ស 10A/1000V |
AC TRMS បច្ចុប្បន្ន
| ជួរ | ដំណោះស្រាយ | ភាពត្រឹមត្រូវ (*) (50Hz¸១២៥kHz) | ការការពារ ប្រឆាំង ថ្លៃលើស |
| 600.0 mA | 0.1 mA | ±(1.2% ការអាន + 5 ខ្ទង់) | ហ្វុយហ្ស៊ីបរហ័ស 800mA / 1000V |
| 6000 mA | 1 mA | ||
| 60.00 mA | 0.01 mA | ||
| 600.0 mA | 0.1 mA | ||
| 10.00A | 0.01A | ±(1.5% ការអាន + 5 ខ្ទង់) | ហ្វុយស៊ីបរហ័ស 10A/1000V |
(*) ភាពត្រឹមត្រូវដែលបានបញ្ជាក់ពី 5% ទៅ 100% នៃជួររង្វាស់; សម្រាប់ភាពត្រឹមត្រូវនៃទម្រង់រលក sinusoidal គឺ: +(10.0% ការអាន + 10dgt)
មុខងារ PEAK ភាពត្រឹមត្រូវ៖ ±(10%rdg+30dgt), AC+DC TRMS បច្ចុប្បន្ន៖ ភាពត្រឹមត្រូវ (50Hz+1kHz): +(3.0% អាន + 20dgt)
ចរន្ត DC ជាមួយ transducer clamp
| ជួរ | សមាមាត្រទិន្នផល | ដំណោះស្រាយ | ភាពត្រឹមត្រូវ (*) | ការការពារ ប្រឆាំង ថ្លៃលើស |
| 1000 mA | 1V/1A | 1 mA | ±(1.5%rdg+ 6dgt) | 1000VDC / ACrms |
| 10A | 100mV/1A | 0.01A | ||
| 30A | ||||
| 40A (**) | 10mV/1A | ±(1.5%rdg.+26dgt) (***) | ||
| 100A |
0.1A |
±(1.5%rdg+ 6dgt) | ||
| 300A | ||||
| 400A (**) | 1mV/1A | ±(1.5%rdg.+26dgt) (***) | ||
| 1000A | 1mV/1A | 1A | ±(1.5%rdg+6dgt) | |
| 3000A |
(*) ភាពត្រឹមត្រូវសំដៅលើតែឧបករណ៍ដោយគ្មានឧបករណ៍ប្តូរ ; (**) ជាមួយ HT4006 transducer clamp ; (***) ឧបករណ៍ភាពត្រឹមត្រូវ + clamp
AC TRMS បច្ចុប្បន្នជាមួយ transducer clamp
| ជួរ | សមាមាត្រទិន្នផល | ដំណោះស្រាយ | ភាពត្រឹមត្រូវ (*) (50Hz¸1kHz) | ការការពារប្រឆាំងនឹងការលើស |
| 1000 mA | 1V/1A | 1 mA | ±(2.5%rdg + 10dgt) | 1000VDC / ACrms |
| 10A | 100mV/1A | 0.01A | ||
| 30A | ||||
| 40A (**) | 10mV/1A | ±(3.5%rdg.+30dgt) (***) | ||
| 100A | 0.1A | ±(2.5%rdg + 10dgt) | ||
| 300A | ||||
| 400A (**) | 1mV/1A | ±(3.5%rdg+30dgt) (***) | ||
| 1000A | 1A | ±(2.5%rdg + 10dgt) | ||
| 3000A |
(*) ភាពត្រឹមត្រូវសំដៅលើតែឧបករណ៍ដោយគ្មានឧបករណ៍ប្តូរ ; ភាពត្រឹមត្រូវដែលបានបញ្ជាក់ពី 5% ទៅ 100% នៃជួរវាស់;
(**) ជាមួយ HT4006 transducer clamp ; (***) ឧបករណ៍ភាពត្រឹមត្រូវ + clamp
សម្រាប់ភាពត្រឹមត្រូវនៃទម្រង់រលក sinusoidal គឺ: ![]() (10.0% ការអាន + 10dgt)
(10.0% ការអាន + 10dgt)
មុខងារ PEAK ភាពត្រឹមត្រូវ៖ ±(10%rdg+30dgt), AC+DC TRMS បច្ចុប្បន្ន៖ ភាពត្រឹមត្រូវ (50Hz![]() 1kHz)៖
1kHz)៖ ![]() (3.0% ការអាន + 20dgt)
(3.0% ការអាន + 20dgt)
ការអាន 4-20mA%
| ជួរ | ដំណោះស្រាយ | ភាពត្រឹមត្រូវ | ការឆ្លើយឆ្លង |
| -25% ¸ 125% | 0.1% | ± 50dgt | 0mA=-25%, 4mA=0%, 20mA=100%, 24mA=125% |
ការធ្វើតេស្ត diode
| មុខងារ | សាកល្បងបច្ចុប្បន្ន | វ៉ុលអតិបរមាtage ជាមួយសៀគ្វីបើកចំហ |
|
|
<1.5mA | 3.2VDC |
ប្រេកង់ (សៀគ្វីអេឡិចត្រូនិច)
| ជួរ | ដំណោះស្រាយ | ភាពត្រឹមត្រូវ | ការការពារ ប្រឆាំង ថ្លៃលើស |
| 40.00Hz ¸ 10kHz | 0.01Hz ¸ 0.001kHz | ±(0.5% ការអាន) | 1000VDC / ACrms |
ភាពរសើប៖ 2Vrms
ប្រេកង់ (សៀគ្វីអេឡិចត្រូនិច)
| ជួរ | ដំណោះស្រាយ | ភាពត្រឹមត្រូវ | ការការពារប្រឆាំងនឹងការលើស |
| 6.000 ហឺត | 0.001 ហឺត | ±(0.09%rdg+5ខ្ទង់) | 1000VDC / ACrms |
| 60.00 ហឺត | 0.01 ហឺត | ||
| 600.0 ហឺត | 0.1 ហឺត | ||
| 6.000kHz | 0.001kHz | ||
| 60.00kHz | 0.01kHz | ||
| 600.0kHz | 0.1kHz | ||
| 1.000MHz | 0.001MHz | ||
| 10.00MHz | 0.01MHz |
ភាពរសើប៖ > 2Vrms (@ 20% +80% វដ្តកាតព្វកិច្ច) និង f<100kHz; > 5Vrms (@ 20% + 80% វដ្តកាតព្វកិច្ច) និង f> 100kHz
ការធ្វើតេស្តភាពធន់និងភាពជាប់
| ជួរ | ដំណោះស្រាយ | ភាពត្រឹមត្រូវ | Buzzer | ការការពារប្រឆាំងនឹងការលើស |
| 600.0 វ៉ | 0.1 វ៉ | ±(0.8% ការអាន + 10dgt) | <50W | 1000VDC / ACrms |
| 6.000 kW | 0.001 kW | ±(0.8% ការអាន + 5 ខ្ទង់) | ||
| 60.00 kW | 0.01 kW | |||
| 600.0 kW | 0.1 kW | |||
| ៦.០០០ មេហ្គាវ៉ាត់ | ៦.០០០ មេហ្គាវ៉ាត់ | |||
| ៦.០០០ មេហ្គាវ៉ាត់ | ៦.០០០ មេហ្គាវ៉ាត់ | ±(2.5% ការអាន + 10dgt) |
វដ្តកាតព្វកិច្ច
| ជួរ | ដំណោះស្រាយ | ភាពត្រឹមត្រូវ |
| 0.1% ¸ 99.9% | 0.1% | ±(1.2% ការអាន + 2 ខ្ទង់) |
ជួរប្រេកង់ជីពចរ៖ 40Hz + 10kHz, ជីពចរ ampពន្លឺ៖ ± 5V (100+s + 100ms)
សមត្ថភាព
| ជួរ | ដំណោះស្រាយ | ភាពត្រឹមត្រូវ | ការការពារ ប្រឆាំង ថ្លៃលើស |
| 60.00nF | 0.01nF | ±(1.5% ការអាន + 20dgt) | 1000VDC / ACrms |
| 600.0nF | 0.1nF | ±(1.2% ការអាន + 8 ខ្ទង់) | |
| ៩.៩៩៩ ម។ ម | ៩.៩៩៩ ម។ ម | ±(1.5% ការអាន + 8 ខ្ទង់) | |
| ៩.៩៩៩ ម។ ម | ៩.៩៩៩ ម។ ម | ±(1.2% ការអាន + 8 ខ្ទង់) | |
| ៩.៩៩៩ ម។ ម | ៩.៩៩៩ ម។ ម | ±(1.5% ការអាន + 8 ខ្ទង់) | |
| ៩.៩៩៩ ម។ ម | ៩.៩៩៩ ម។ ម | ±(2.5% ការអាន + 20dgt) |
សីតុណ្ហភាពជាមួយនឹងការស៊ើបអង្កេតប្រភេទ K
| ជួរ | ដំណោះស្រាយ | ភាពត្រឹមត្រូវ (*) | ការការពារប្រឆាំងនឹងការលើស |
| -40.0°C ÷ 600.0°C | 0.1°C | ±(1.5% ការអាន + 3°C) | 1000VDC / ACrms |
| ២៣°C ÷ ៥°C | 1°C | ||
| -40.0°F ÷ 600.0°F | 0.1°F | ±(1.5%rdg+ 5.4°F) | |
| 600°F ÷ 2462°F | 1°F |
(*) ភាពត្រឹមត្រូវនៃឧបករណ៍ដោយគ្មានការស៊ើបអង្កេត ; ភាពត្រឹមត្រូវដែលបានបញ្ជាក់ជាមួយនឹងសីតុណ្ហភាពបរិស្ថានមានស្ថេរភាពនៅ±1°C
សម្រាប់ការវាស់វែងយូរអង្វែង ការអានកើនឡើង 2°C
7.1.1. ស្តង់ដារយោង
សុវត្ថិភាព៖ IEC/EN61010-1
EMC: IEC/EN 61326-1
អ៊ីសូឡង់: អ៊ីសូឡង់ទ្វេ
កម្រិតបំពុល៖ ២
លើសtage ប្រភេទ៖ CAT IV 600V, CAT III 1000V
៧.១.១. លក្ខណៈទូទៅ
លក្ខណៈមេកានិច
ទំហំ (L x W x H): 175 x 85 x 55mm (7 x 3 x 2in)
ទំងន់ (រួមបញ្ចូលថ្ម): 400g (14 អោន)
ការការពារមេកានិច: IP40
ការផ្គត់ផ្គង់ថាមពល
ប្រភេទថ្ម៖ 1×7.4V ថ្ម Li-ION អាចសាកបាន 1300mAh
ការផ្គត់ផ្គង់ថាមពលឆ្នាំងសាកថ្ម៖ 100/240VAC, 50/60Hz, 10VDC, 1A
ការចង្អុលបង្ហាញអំពីថ្មទាប៖ និមិត្តសញ្ញា "![]() "នៅលើការបង្ហាញ
"នៅលើការបង្ហាញ
អាយុកាលថ្ម៖ ប្រហាក់ប្រហែល។ 15 ម៉ោង។
បិទដោយស្វ័យប្រវត្តិ៖ បន្ទាប់ពី 5 60 នាទី ' idling (អាចត្រូវបានបិទ)
fuses: F10A/1000V, 10 x 38mm (បញ្ចូល 10A)
F800mA/1000V, 6 x 32mm (បញ្ចូល mAuA)
បង្ហាញ
ការបំប្លែង៖ TRMS
លក្ខណៈ៖ ពណ៌ TFT, 6000 ចំណុចជាមួយរបារក្រាហ្វិក
Sampប្រេកង់ Ling: 3 ដង / s
ការចងចាំ វិធានការ → អតិបរមា 2000 ក្រាហ្វិក → អតិបរមា 50 ការកត់ត្រា → 128 នៃអតិបរមា 20000 ពិន្ទុ
៧.២.១. លក្ខខណ្ឌបរិស្ថានសម្រាប់ការប្រើប្រាស់
សីតុណ្ហភាពយោង៖ ២០ អង្សាសេ ![]() 28°C (64°F
28°C (64°F ![]() ៧១៦ អង្សារ)
៧១៦ អង្សារ)
សីតុណ្ហភាពប្រតិបត្តិការ៖ 5°C ÷ 40°C (41°F ![]() ៧១៦ អង្សារ)
៧១៦ អង្សារ)
សំណើមដែលទាក់ទងដែលអាចអនុញ្ញាតបាន៖ <80%RH
សីតុណ្ហភាពផ្ទុក៖ -20°C ÷ 60°C (-4°F ![]() ៧១៦ អង្សារ)
៧១៦ អង្សារ)
សំណើមផ្ទុក៖ <80%RH
រយៈកំពស់ប្រតិបត្តិការអតិបរមា៖ 2000m (6562ft)
ឧបករណ៍នេះបំពេញតម្រូវការរបស់ Low Voltage Directive 2014/35/EU (LVD) និង EMC Directive 2014/30/EU
ឧបករណ៍នេះបំពេញតម្រូវការនៃសេចក្តីណែនាំរបស់អឺរ៉ុប 2011/65/EU (RoHS) និង 2012/19/EU (WEEE)
គ្រឿងបន្លាស់
៧.៣.១. គ្រឿងបន្ថែមត្រូវបានផ្តល់ជូន
- គូនៃការធ្វើតេស្តនាំមុខជាមួយនឹងគន្លឹះ 2/4 ម។
- អាដាប់ទ័រ + ការស៊ើបអង្កេតខ្សែប្រភេទ K
- ថ្មសាក Li-ION លេខកូដ BAT64
- ការផ្គត់ផ្គង់ថាមពលឧបករណ៍បញ្ចូលថ្មច្រើន + ចំណុចប្រទាក់លេខកូដ A64
- កាបូបស្ពាយ និងសៀវភៅណែនាំអ្នកប្រើប្រាស់
7.2.2. គ្រឿងបន្លាស់ស្រេចចិត្ត
- ការស៊ើបអង្កេតប្រភេទ K សម្រាប់សីតុណ្ហភាពខ្យល់ និងឧស្ម័ន លេខកូដ TK107
- ការស៊ើបអង្កេតប្រភេទ K សម្រាប់សីតុណ្ហភាពសារធាតុពាក់កណ្តាលរឹង លេខកូដ TK108
- ការស៊ើបអង្កេតប្រភេទ K សម្រាប់សីតុណ្ហភាពសារធាតុរាវ លេខកូដ TK109
- ការស៊ើបអង្កេតប្រភេទ K សម្រាប់សីតុណ្ហភាពផ្ទៃ លេខកូដ TK110
- ការស៊ើបអង្កេតប្រភេទ K សម្រាប់សីតុណ្ហភាពផ្ទៃជាមួយនឹងព័ត៌មានជំនួយ 90° លេខកូដ TK111
- ឧបករណ៍បំប្លែងដែលអាចបត់បែនបាន clamp AC 30/300/3000A កូដ។ F3000U
- ឧបករណ៍បំលែងស្តង់ដារ clamp DC/AC 40-400A/1V Cod ។ HT4006
- ឧបករណ៍បំលែងស្តង់ដារ clamp AC 1-100-1000A/1V Cod ។ HT96U
- ឧបករណ៍បំលែងស្តង់ដារ clamp AC 10-100-1000A/1V Cod ។ HT97U
- ឧបករណ៍បំលែងស្តង់ដារ clamp DC 1000A/1V Cod ។ HT98U
- អាដាប់ទ័រសម្រាប់ transducer ស្តង់ដារ clamp ជាមួយឧបករណ៍ភ្ជាប់ HT Cod ។ ណូកានបា
ជំនួយ
៨.១. លក្ខខណ្ឌធានា
ឧបករណ៍នេះត្រូវបានធានាប្រឆាំងនឹងសម្ភារៈ ឬពិការភាពផលិតកម្ម ដោយអនុលោមតាមលក្ខខណ្ឌនៃការលក់ទូទៅ។ ក្នុងអំឡុងពេលធានា គ្រឿងបន្លាស់ដែលខូចអាចត្រូវបានជំនួស។ ទោះជាយ៉ាងណាក៏ដោយក្រុមហ៊ុនផលិតរក្សាសិទ្ធិក្នុងការជួសជុលឬជំនួសផលិតផល។ ប្រសិនបើឧបករណ៍ត្រូវបានប្រគល់ជូនសេវាកម្មក្រោយការលក់ ឬទៅកាន់អ្នកចែកបៀ ការដឹកជញ្ជូននឹងត្រូវគិតថ្លៃរបស់អតិថិជន។ ទោះយ៉ាងណាក៏ដោយ ការដឹកជញ្ជូននឹងត្រូវបានយល់ព្រមជាមុន។ របាយការណ៍មួយនឹងតែងតែត្រូវបានភ្ជាប់ជាមួយការដឹកជញ្ជូន ដោយបញ្ជាក់ពីហេតុផលសម្រាប់ការត្រឡប់មកវិញរបស់ផលិតផល។ ប្រើតែការវេចខ្ចប់ដើមសម្រាប់ការដឹកជញ្ជូន។ រាល់ការខូចខាតដោយសារការប្រើប្រាស់សម្ភារៈវេចខ្ចប់ដែលមិនមែនជាដើមនឹងត្រូវគិតប្រាក់ទៅអតិថិជន។ ក្រុមហ៊ុនផលិតបដិសេធរាល់ការទទួលខុសត្រូវចំពោះការរងរបួសដល់មនុស្ស ឬការខូចខាតទ្រព្យសម្បត្តិ។
ការធានាមិនត្រូវអនុវត្តក្នុងករណីដូចខាងក្រោមៈ
- ជួសជុល និង/ឬផ្លាស់ប្តូរគ្រឿងបន្លាស់ និងថ្ម (មិនគ្របដណ្តប់ដោយការធានា)។
- ការជួសជុលដែលអាចក្លាយជាការចាំបាច់ជាផលវិបាកនៃការប្រើប្រាស់ឧបករណ៍មិនត្រឹមត្រូវ ឬដោយសារតែការប្រើប្រាស់របស់វារួមជាមួយនឹងឧបករណ៍ដែលមិនឆបគ្នា។
- ការជួសជុលដែលអាចក្លាយជាចាំបាច់ជាផលវិបាកនៃការវេចខ្ចប់មិនត្រឹមត្រូវ។
- ការជួសជុលដែលអាចក្លាយជាការចាំបាច់ជាផលវិបាកនៃអន្តរាគមន៍ដែលធ្វើឡើងដោយបុគ្គលិកដែលគ្មានការអនុញ្ញាត។
- ការកែប្រែឧបករណ៍ដែលបានធ្វើឡើងដោយគ្មានការអនុញ្ញាតច្បាស់លាស់ពីអ្នកផលិត។
- ប្រើមិនបានផ្តល់ឱ្យក្នុងលក្ខណៈពិសេសរបស់ឧបករណ៍ ឬក្នុងសៀវភៅណែនាំទេ។
ខ្លឹមសារនៃសៀវភៅណែនាំនេះមិនអាចផលិតឡើងវិញក្នុងទម្រង់ណាមួយដោយគ្មានការអនុញ្ញាតពីអ្នកផលិតនោះទេ។
ផលិតផលរបស់យើងត្រូវបានប៉ាតង់ ហើយពាណិជ្ជសញ្ញារបស់យើងត្រូវបានចុះបញ្ជី។ ក្រុមហ៊ុនផលិតរក្សាសិទ្ធិក្នុងការផ្លាស់ប្តូរលក្ខណៈបច្ចេកទេស និងតម្លៃ ប្រសិនបើនេះគឺដោយសារតែការកែលម្អបច្ចេកវិទ្យា។
៨.២. ជំនួយ
ប្រសិនបើឧបករណ៍មិនដំណើរការត្រឹមត្រូវ មុននឹងទាក់ទងសេវាកម្មក្រោយការលក់ សូមពិនិត្យមើលលក្ខខណ្ឌនៃថ្ម និងខ្សែ ហើយជំនួសវាប្រសិនបើចាំបាច់។ ប្រសិនបើឧបករណ៍នៅតែដំណើរការមិនត្រឹមត្រូវ សូមពិនិត្យមើលថាផលិតផលត្រូវបានដំណើរការស្របតាមការណែនាំដែលមាននៅក្នុងសៀវភៅណែនាំនេះ។ ប្រសិនបើឧបករណ៍ត្រូវបានប្រគល់ជូនសេវាកម្មក្រោយការលក់ ឬទៅកាន់អ្នកចែកបៀ ការដឹកជញ្ជូននឹងត្រូវគិតថ្លៃរបស់អតិថិជន។ ទោះយ៉ាងណាក៏ដោយ ការដឹកជញ្ជូននឹងត្រូវបានយល់ព្រមជាមុន។ របាយការណ៍មួយនឹងតែងតែត្រូវបានភ្ជាប់ជាមួយការដឹកជញ្ជូន ដោយបញ្ជាក់ពីហេតុផលសម្រាប់ការត្រឡប់មកវិញរបស់ផលិតផល។ ប្រើតែការវេចខ្ចប់ដើមសម្រាប់ការដឹកជញ្ជូន។ ការខូចខាតដោយសារការប្រើប្រាស់សម្ភារៈវេចខ្ចប់ដែលមិនមែនដើមនឹងត្រូវគិតថ្លៃដល់អតិថិជន។
HT ITALIA SRL
តាមរយៈ della Boaria, 40
48018 – Faenza (RA) – អ៊ីតាលី
ក្រុមហ៊ុន T +៦៥ ៦២២២ ៦១៣៦
F +39 0546 621144
M info@ht-instrumnents.com
www.ht-instruments.it
HT INSTRUMENTS SL
គ/ស្របច្បាប់, ៨៩
08024 Barcelona - អេស្ប៉ាញ
T +34 93 408 17 77
F +34 ៨៩ ១៨៩ ១៤៩ ១៦៩
M info@htinstruments.es
www.ht-instruments.com/es-es/
ឧបករណ៍ HT GmbH
Am Waldfriedhof 1 ខ
D-41352 Korschenbroich - អាល្លឺម៉ង់
T +49 (0) 2161 564 581
F +49 (០) ៤៩៥ ៥៨០ ៨៤៥
M info@htinstruments.de
www.ht-instruments.de
តើយើងនៅទីណា
 https://l.ead.me/bcsxjF
© រក្សាសិទ្ធិ HT ITALIA 2024
ចេញផ្សាយ 3.01 – 04/12/2024
ឯកសារ/ធនធាន
 |
ឧបករណ៍ HT HT64 TRMS/AC+DC Digital Multimeter ជាមួយនឹងអេក្រង់ LCD ពណ៌ [pdf] សៀវភៅណែនាំអ្នកប្រើប្រាស់ HT64, HT64 TRMS AC DC Digital Multimeter ជាមួយនឹងអេក្រង់ LCD ពណ៌, HT64, TRMS AC DC Digital Multimeter ជាមួយនឹងអេក្រង់ LCD ពណ៌, Digital Multimeter ជាមួយនឹងអេក្រង់ LCD ពណ៌, Multimeter ជាមួយអេក្រង់ LCD ពណ៌, អេក្រង់ LCD ពណ៌, អេក្រង់ LCD, ការបង្ហាញ |