1. សេចក្តីផ្តើម
Thank you for choosing the SIFENE Mini Single Serve Coffee Maker, Model KC211. This manual provides essential information for the safe operation, maintenance, and troubleshooting of your new coffee maker. Please read it thoroughly before first use and retain it for future reference.

Image 1.1: SIFENE Mini Single Serve Coffee Maker in operation, showing coffee pouring into a white mug.
2. សេចក្តីណែនាំអំពីសុវត្ថិភាពសំខាន់ៗ
នៅពេលប្រើប្រាស់ឧបករណ៍អគ្គិសនី ការប្រុងប្រយ័ត្នសុវត្ថិភាពជាមូលដ្ឋានគួរតែត្រូវបានអនុវត្តតាមជានិច្ច ដើម្បីកាត់បន្ថយហានិភ័យនៃអគ្គីភ័យ ការឆក់អគ្គិសនី និង/ឬរបួសដល់មនុស្ស រួមទាំងកត្តាដូចខាងក្រោមៈ
- អានការណែនាំទាំងអស់។
- កុំប៉ះផ្ទៃក្តៅ។ ប្រើដៃឬដៃចុច។
- ដើម្បីការពារពីអគ្គីភ័យ ការឆក់អគ្គិសនី និងរបួសដល់មនុស្ស សូមកុំដាក់ខ្សែ ឌុយ ឬម៉ាស៊ីនឆុងកាហ្វេទៅក្នុងទឹក ឬវត្ថុរាវផ្សេងទៀត។
- ការត្រួតពិនិត្យយ៉ាងជិតស្និទ្ធគឺចាំបាច់នៅពេលដែលឧបករណ៍ណាមួយត្រូវបានប្រើប្រាស់ដោយ ឬនៅជិតកុមារ។
- ដកដោតចេញពីព្រីនៅពេលមិនប្រើ និងមុនពេលសម្អាត។ ទុកឱ្យត្រជាក់មុនពេលដាក់ ឬដោះផ្នែក និងមុនពេលសម្អាតឧបករណ៍។
- កុំដំណើរការឧបករណ៍ដែលមានខ្សែ ឬដោតដែលខូច ឬបន្ទាប់ពីឧបករណ៍ដំណើរការខុសប្រក្រតី ឬត្រូវបានខូចក្នុងលក្ខណៈណាមួយ។ ប្រគល់ឧបករណ៍ទៅកន្លែងផ្តល់សេវាដែលមានការអនុញ្ញាតដែលនៅជិតបំផុតសម្រាប់ការពិនិត្យ ជួសជុល ឬការកែតម្រូវ។
- ការប្រើប្រាស់ឧបករណ៍ភ្ជាប់គ្រឿងបន្លាស់ដែលមិនត្រូវបានណែនាំដោយក្រុមហ៊ុនផលិតឧបករណ៍អាចបណ្តាលឱ្យមានអគ្គីភ័យ ការឆក់អគ្គិសនី ឬរបួសដល់មនុស្ស។
- កុំប្រើនៅខាងក្រៅ។
- កុំបណ្តោយឱ្យខ្សែភ្លើងព្យួរលើគែមតុ ឬបញ្ជរ ឬប៉ះផ្ទៃក្តៅ។
- កុំដាក់នៅលើ ឬនៅជិតចង្ក្រានហ្គាសក្តៅ ឬឧបករណ៍ដុតអគ្គិសនី ឬនៅក្នុងឡដែលមានកំដៅ។
- ភ្ជាប់ឌុយទៅនឹងឧបករណ៍ជាមុនសិន បន្ទាប់មកដោតខ្សែចូលទៅក្នុងព្រីជញ្ជាំង។ ដើម្បីផ្តាច់ សូមបើកឧបករណ៍បញ្ជាណាមួយឱ្យ "បិទ" បន្ទាប់មកដកដោតចេញពីព្រីជញ្ជាំង។
- កុំប្រើឧបករណ៍ផ្សេងក្រៅពីការប្រើប្រាស់ដែលមានបំណង។
- ឧបករណ៍នេះគឺសម្រាប់ប្រើប្រាស់ក្នុងផ្ទះតែប៉ុណ្ណោះ។
3. ផលិតផលលើសview
3.1 លក្ខណៈសំខាន់ៗ
- 2-in-1 Brewing: Compatible with K-pods and fresh coffee grounds using the included reusable stainless steel filter.
- Customizable Water Levels: Clear water window with measurements from 6 to 12 oz for precise filling.
- ញ៉ាំលឿន៖ Brews a 12 oz cup in approximately 2 minutes.
- ការគ្រប់គ្រងការប៉ះតែមួយ៖ Simple operation with a single button.
- ការរចនាបង្រួម៖ Ideal for small spaces (4.3" D x 7.8" W x 9.4" H).
- Self-Cleaning & Descaling Reminder: Indicator light for descaling and easy cleaning process.
- សម្ភារៈគ្មាន BPA៖ Constructed from non-BPA materials for safety.
3.2 សមាសធាតុ

រូបភាពទី 3.1: ជាងview of the coffee maker with key dimensions and features. The image shows the compact size of the coffee maker (7.8" W x 4.3" D x 9.4" H) next to a water bottle and a coffee mug, highlighting its small footprint and the water window with cup size markings (6, 8, 10, 12 oz).
- អាងស្តុកទឹកដែលមានបង្អួចទឹក
- គម្រប
- ក្បាលញ៉ាំ
- Control Button / Descale Indicator
- ថាសចាក់ទឹក។
- K-pod Holder (removable)
- Ground Coffee Filter Basket (removable)
4. រៀបចំ និងប្រើប្រាស់ដំបូង
4.1 ការវេចខ្ចប់
Carefully remove all packaging materials and inspect the coffee maker for any damage. Ensure all components listed in Section 3.2 are present.
4.2 ការសម្អាតបឋម
Before first use, clean all removable parts (K-pod holder, ground coffee filter basket, drip tray) with warm, soapy water. Wipe the exterior of the coffee maker with a damp ក្រណាត់។ កុំជ្រមុជឯកតាសំខាន់ក្នុងទឹក។
4.3 វដ្តនៃការញ៉ាំដំបូង (វដ្តនៃការលាងសម្អាត)
To prime the machine and remove any manufacturing residues:
- Fill the water reservoir with fresh water up to the MAX (12 oz) line.
- ដាក់ពែងទទេមួយនៅលើថាសចាក់ទឹក។
- Close the lid without any K-pod or ground coffee filter inserted.
- Press the power button once. The white light will illuminate, and the machine will begin a brewing cycle, dispensing hot water into the mug.
- Once the cycle is complete, discard the hot water. Your coffee maker is now ready for use.
5. សេចក្តីណែនាំប្រតិបត្តិការ
5.1 Brewing with K-pods
- បើកគម្របម៉ាស៊ីនឆុងកាហ្វេ។
- Insert a K-pod into the K-pod holder. Ensure the K-pod is seated correctly.
- Fill the water reservoir with fresh water to your desired level (6-12 oz). Do not exceed the MAX line.
- ដាក់ពែងកាហ្វេរបស់អ្នកនៅលើថាសស្រោចទឹក។
- Close the lid firmly. Ensure the handle of the holder is placed horizontally for proper closure.
- Press the power button once for hot coffee. The white light will indicate brewing.
- Wait for the brewing cycle to complete. Do not open the lid during brewing.
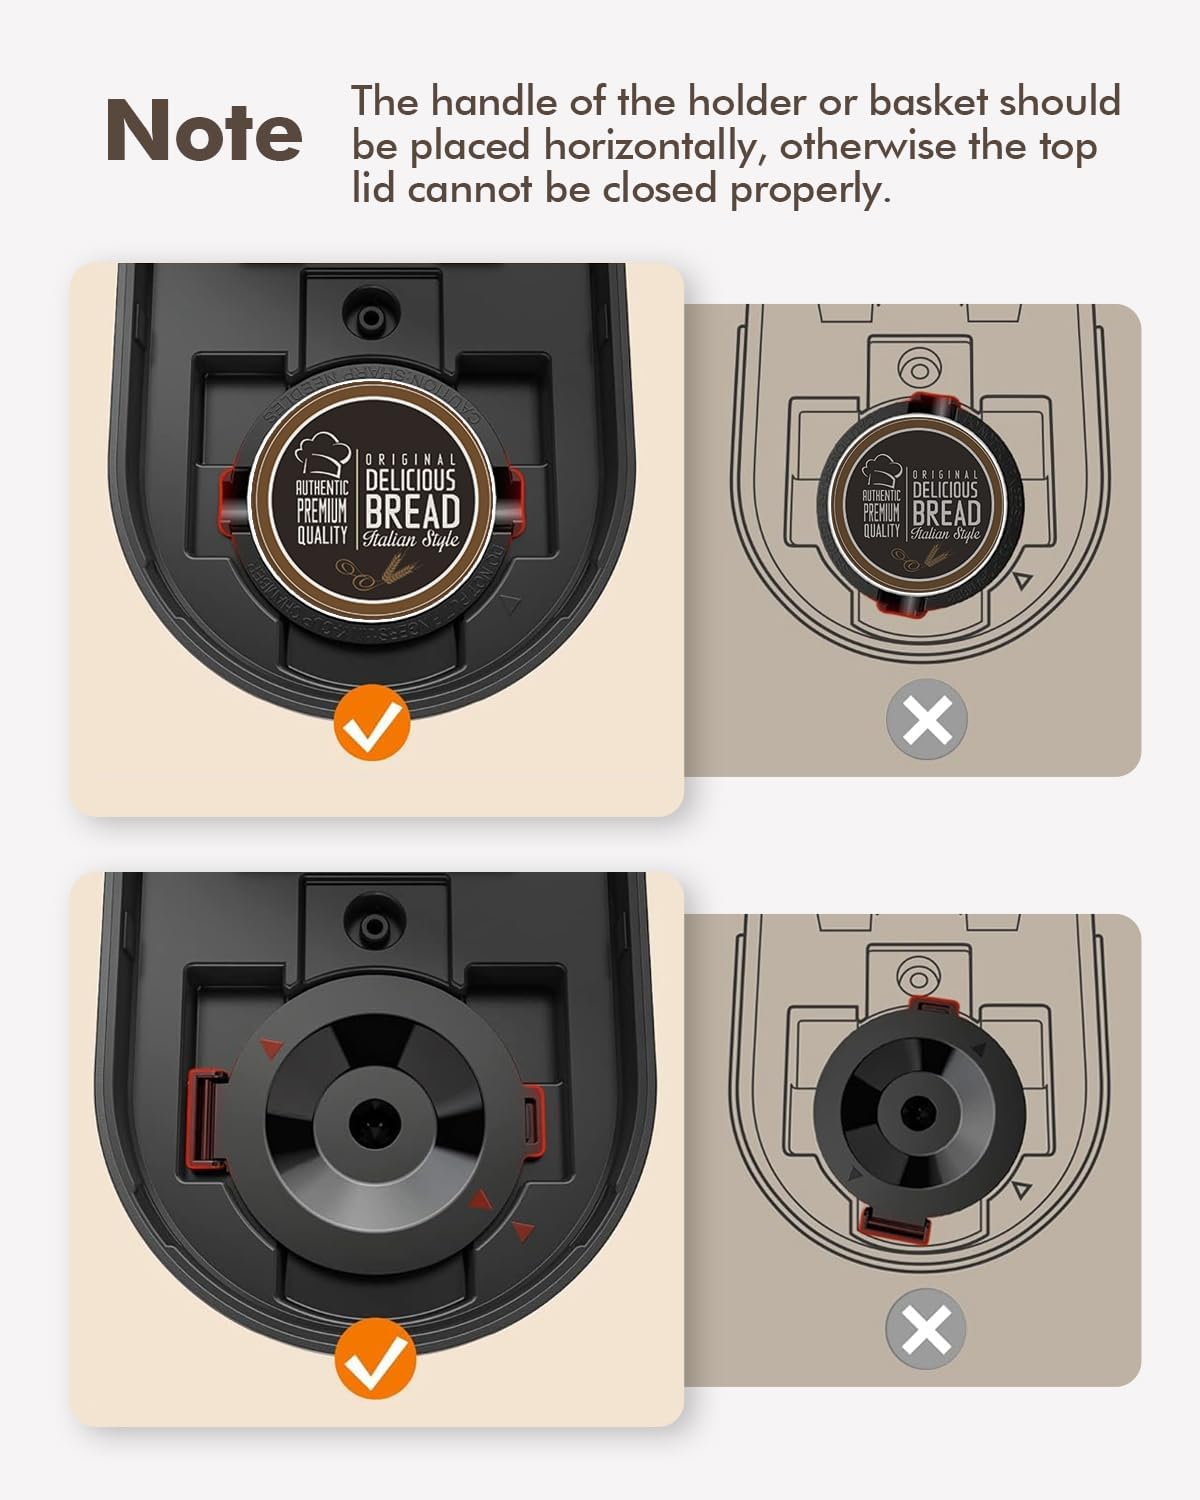
Image 5.1: Correct placement of K-pod and ground coffee filter. The image illustrates the proper horizontal alignment of the holder handle for both K-pods and ground coffee filters to ensure the lid closes securely.
៤.២ ការញ៉ាំកាហ្វេជាមួយម្សៅ
- បើកគម្របម៉ាស៊ីនឆុងកាហ្វេ។
- Insert the reusable ground coffee filter basket into the brew head.
- Add your desired amount of ground coffee to the filter basket. Do not overfill.
- Fill the water reservoir with fresh water to your desired level (6-12 oz). Do not exceed the MAX line.
- ដាក់ពែងកាហ្វេរបស់អ្នកនៅលើថាសស្រោចទឹក។
- Close the lid firmly. Ensure the handle of the filter basket is placed horizontally for proper closure.
- Press the power button once for hot coffee. The white light will indicate brewing.
- Wait for the brewing cycle to complete. Do not open the lid during brewing.
5.3 Iced Coffee Function
The coffee maker features an iced coffee brewing mode. Follow these steps:
- Prepare your K-pod or ground coffee as described above.
- Fill the water reservoir with fresh water to your desired level (6-12 oz).
- Fill your coffee mug with ice and place it on the drip tray.
- បិទគម្របយ៉ាងរឹងមាំ។
- Press the power button twice. The blue light will illuminate, indicating iced coffee brewing mode.
- រង់ចាំសម្រាប់វដ្តនៃការញ៉ាំបានបញ្ចប់។

Image 5.2: Control panel with power button and descale reminder. The image shows the power button and the "DESCALE" indicator light, along with simple operating instructions printed on the lid.
6. ការថែទាំ និងសម្អាត
6.1 ការសម្អាតប្រចាំថ្ងៃ
- After each use, remove and rinse the K-pod holder or ground coffee filter basket.
- ចាក់ទឹកចេញ ហើយលាងសម្អាតថាសស្រោចទឹក។
- ជូតផ្នែកខាងក្រៅនៃម៉ាស៊ីនឆុងកាហ្វេជាមួយនឹងការផ្សាយពាណិជ្ជកម្មamp ក្រណាត់។
៧ ការដកខ្លួន
Over time, mineral deposits (scale) can build up in your coffee maker, affecting performance and coffee taste. The "DESCALE" indicator light will illuminate red when descaling is recommended.

Image 6.1: Preparing descaling solution. The image shows a hand pouring descaling powder into a measuring cup filled with water, next to the coffee maker.
នីតិវិធីកាត់បន្ថយ៖
- Prepare a descaling solution according to the manufacturer's instructions (e.g., a mixture of white vinegar and water, or a commercial descaling agent).
- Pour the descaling solution into the water reservoir up to the MAX (12 oz) line.
- Place a large empty mug or container on the drip tray to collect the solution.
- Close the lid without any K-pod or ground coffee filter inserted.
- Press and hold the power button for 2 seconds to initiate the descaling cycle. The red "DESCALE" light will illuminate.
- The machine will run a descaling cycle, dispensing the solution. This may take longer than a regular brew cycle.
- Once the cycle is complete, discard the used solution.
- Rinse the reservoir thoroughly and run 2-3 cycles with fresh water to flush out any remaining descaling solution.
- The "DESCALE" light should turn off after successful descaling.
7. ការដោះស្រាយបញ្ហា
| បញ្ហា | មូលហេតុដែលអាចកើតមាន | ដំណោះស្រាយ |
|---|---|---|
| Coffee not brewing / No water dispensed. |
|
|
| កាហ្វេមានរសជាតិខ្សោយ ឬមានជាតិទឹក។ |
|
|
| ពន្លឺ "DESCALE" ត្រូវបានបើក។ | ការប្រមូលផ្តុំសារធាតុរ៉ែនៅក្នុងម៉ាស៊ីន។ | Perform descaling procedure (Section 6.2). |
| ការលេចធ្លាយម៉ាស៊ីន។ |
|
|
8. លក្ខណៈបច្ចេកទេស
| លក្ខណៈ | លម្អិត |
|---|---|
| ម៉ាក | ស៊ីហ្វិន |
| ឈ្មោះម៉ូដែល | KC211 |
| វិមាត្រផលិតផល | 7.79"D x 4.33"W x 9.48"H |
| ប្រភេទម៉ាស៊ីនឆុងកាហ្វេ | ម៉ាស៊ីនកាហ្វេប្រភេទ Drip សម្រាប់បម្រើម្តង |
| ប្រភេទបញ្ចូលកាហ្វេ | Both K-pods and ground coffee |
| វ៉ុលtage | 120 វ៉ុល |
| លក្ខណៈពិសេស | Auto Clean Function, Auto Shut-Off, Permanent Filter, Descaling Reminder |
| សមាសធាតុរួមបញ្ចូល | Single Serve Coffee Maker, 2 Filters (K-pod holder, ground coffee filter) |
| ទំងន់ធាតុ | 2.5 ផោន |
9. ការធានា និងការគាំទ្រ
9.1 ព័ត៌មានធានា
ព័ត៌មានលម្អិតនៃការធានាជាក់លាក់ត្រូវបានផ្តល់ជូនជាធម្មតាជាមួយនឹងការវេចខ្ចប់ផលិតផល ឬនៅលើផ្លូវការរបស់អ្នកផលិត webគេហទំព័រ។ សូមមើលប្រភពទាំងនេះសម្រាប់លក្ខខណ្ឌនៃការធានាដែលត្រឹមត្រូវ និងទាន់សម័យបំផុត។
9.2 ជំនួយអតិថិជន
For technical assistance, troubleshooting beyond this manual, or warranty claims, please contact SIFENE customer support. Contact information can usually be found on the product packaging, the official SIFENE webគេហទំព័រ ឬតាមរយៈអ្នកលក់រាយរបស់អ្នក។
អ្នកក៏អាចទៅទស្សនា SIFENE Store on Amazon សម្រាប់ព័ត៌មានផលិតផលបន្ថែម និងធនធានជំនួយ។


