
waveshare 0.96inch OLED Display Module(C)
Waveshare 0.96inch OLED Module User Manual
Model: 0.96inch OLED Display Module(C)
1. សេចក្តីផ្តើម
This user manual provides detailed instructions for the Waveshare 0.96inch OLED Module. This module features an embedded SSD1315 driver chip and supports both SPI and I2C communication protocols. It is designed for integration with various development boards, including Raspberry Pi, Arduino, and STM32.
The 0.96inch OLED Module is a compact display solution with a resolution of 128 × 64 pixels, offering clear visual output for your projects.
លក្ខណៈពិសេសនៃផលិតផល
- 0.96inch OLED Display Module with embedded SSD1315 Driver Chip.
- Resolution: 128 × 64 Pixels.
- Communication Interfaces: 4-wire SPI / I2C.
- Ultra-narrow bezel and compact size.
- Onboard voltage translator for versatile compatibility.
- Display Color: Upper yellow & lower blue (two-color display).
- Comes with online development resources and examples for Raspberry Pi, Arduino, and STM32.
3. មាតិកាកញ្ចប់
- 0.96inch OLED Module x1
- Jumper cable female-female 7PIN x1

Image: The 0.96inch OLED Module shown with the included 7-pin female-female jumper cable.
4. លក្ខណៈបច្ចេកទេស
| ប៉ារ៉ាម៉ែត្រ | តម្លៃ |
|---|---|
| វ៉ុលប្រតិបត្តិការtage | 3.3V/5V (IO high-level voltage is as same as the power supply.) |
| ចំណុចប្រទាក់ទំនាក់ទំនង | 4-wire SPI / I2C |
| ប្រភេទអេក្រង់ | OLED |
| បន្ទះឈីបត្រួតពិនិត្យ | SSD1315 |
| ដំណោះស្រាយ | ៨០០ × ៤៨០ ភីកសែល |
| វិមាត្រគ្រោង | ៦០០០ មម× ២០០០ មម |
| ទំហំបង្ហាញ | ៦០០០ មម× ២០០០ មម |
| បង្ហាញពណ៌ | Blue/White/Blue and Yellow (1/4 yellow on the top) |
| សីតុណ្ហភាពប្រតិបត្តិការ | -20°C ~ 70°C |
| សីតុណ្ហភាពផ្ទុក | -30°C ~ 80°C |
| Viewនៅមុំ | > 160° |
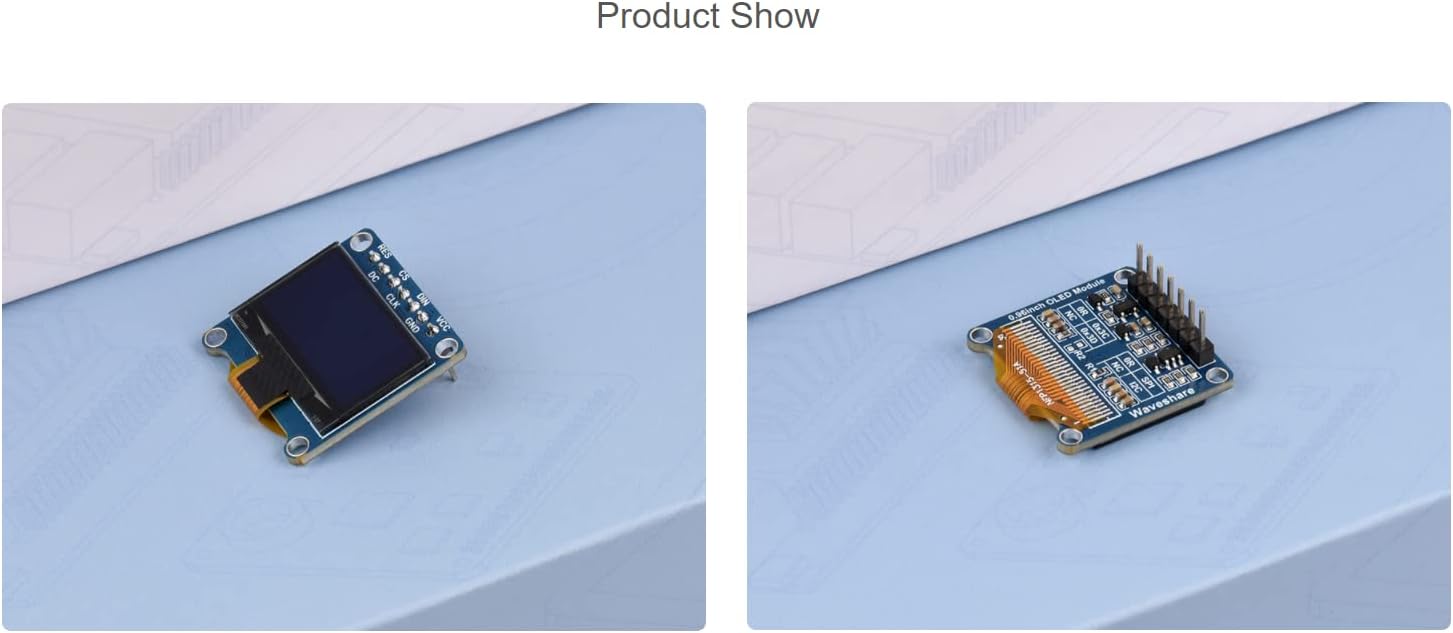
Image: Diagram showing the physical dimensions of the OLED module and a summary of its key specifications.
5. Control Interface Pinout
The OLED module features the following control pins:
- RES៖ Reset pin, active low.
- DC៖ Data/Command selection pin (high for data, low for command).
- CS៖ Chip selection pin, active low.
- CLK៖ Clock input pin for communication.
- ឌីន៖ Data input pin.
- GND៖ ការតភ្ជាប់ដី។
- VCC៖ Power supply input (3.3V / 5V).

រូបភាព៖ ខាងមុខ view of the 0.96inch OLED module, highlighting the pin labels (RES, CS, DIN, VCC, DC, CLK, GND) and a sample display showing time and date.

រូបភាព៖ ថយក្រោយ view of the 0.96inch OLED module, illustrating the solder pads for configuring SPI or I2C communication modes.
6. Hardware Connection and Setup
6.1. Connecting with Raspberry Pi via SPI Interface
When connecting the OLED module to a Raspberry Pi, use a 7-pin cable and refer to the pin correspondence table below for proper wiring.
| ម្ជុល OLED | BCM2835 (Raspberry Pi) | Board Pin (Raspberry Pi) |
|---|---|---|
| វី.ស៊ី.ស៊ី | 3.3V | 3.3V |
| GND | GND | GND |
| ឌីន | MOSI / SDA | ៣៥០/២៤០០ |
| CLK | SCLK / SCL | ៣៥០/២៤០០ |
| CS | ២២៧ | 24 |
| DC | 25 | 22 |
| RES | 27 | 13 |
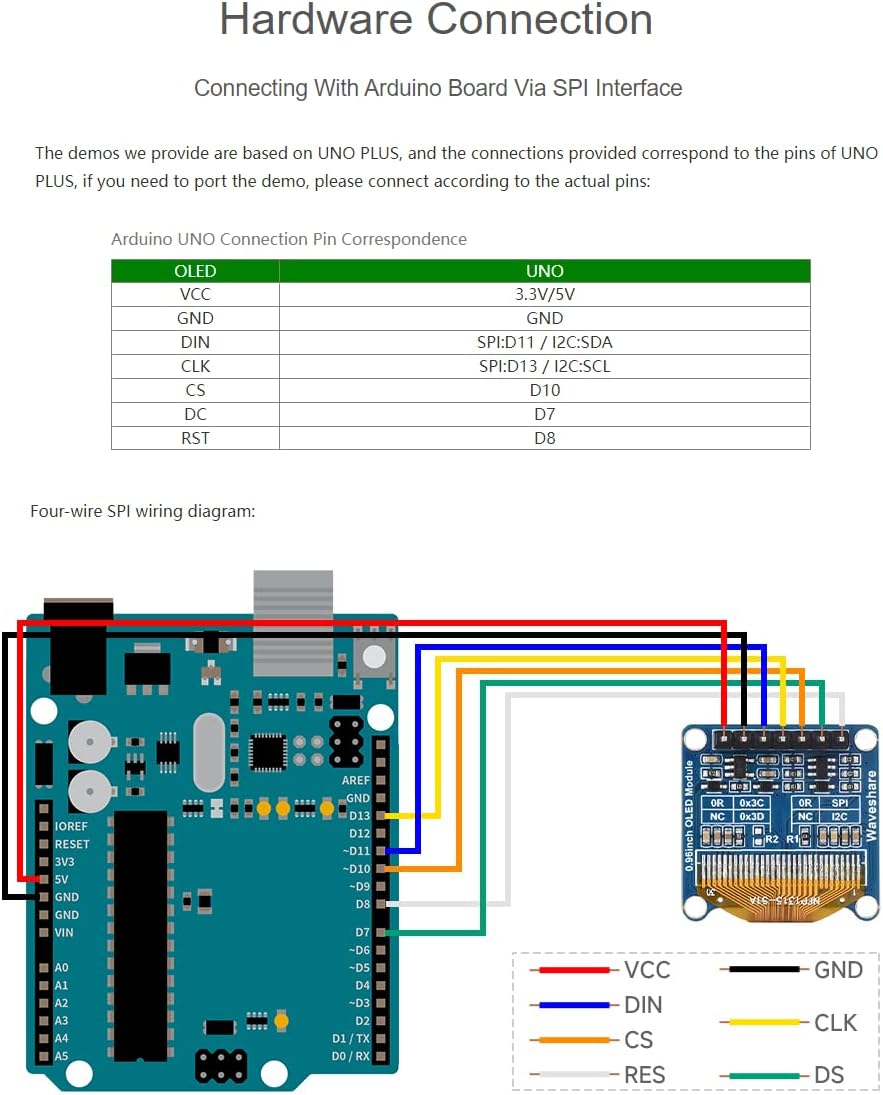
Image: Visual guide demonstrating the correct wiring connections between the 0.96inch OLED module and a Raspberry Pi board using the SPI interface.
6.2. Connecting with Arduino Board via SPI Interface
The provided demos are based on Arduino UNO PLUS. For other Arduino boards, connect the pins according to the actual pinout of your board. Refer to the Arduino UNO connection pin correspondence table below.
| ម្ជុល OLED | UNO Pin |
|---|---|
| វី.ស៊ី.ស៊ី | 3.3V / 5V |
| GND | GND |
| ឌីន | SPI:D11 / I2C:SDA |
| CLK | SPI:D13 / I2C:SCL |
| CS | D10 |
| DC | D7 |
| RST | D8 |

Image: Visual guide demonstrating the correct wiring connections between the 0.96inch OLED module and an Arduino UNO board using the SPI interface.
6.3. Connecting with STM32
The provided demos are based on the STM32F103RBT6. If you need to port the demo to a different STM32 board, please connect the pins according to the actual pinout of your specific board. Refer to the STM32F103RBT6 connection pin correspondence table below.
| ម្ជុល OLED | STM32 Pin |
|---|---|
| វី.ស៊ី.ស៊ី | 3.3V |
| GND | GND |
| ឌីន | SPI:PA7 / I2C:PB9 / I2C_SOFT: PC8 |
| CLK | SPI:PA5 / I2C:PB8 / I2C_SOFT: PC6 |
| CS | PB6 |
| ឃ/ស៊ី | PA8 |
| RES | PA9 |
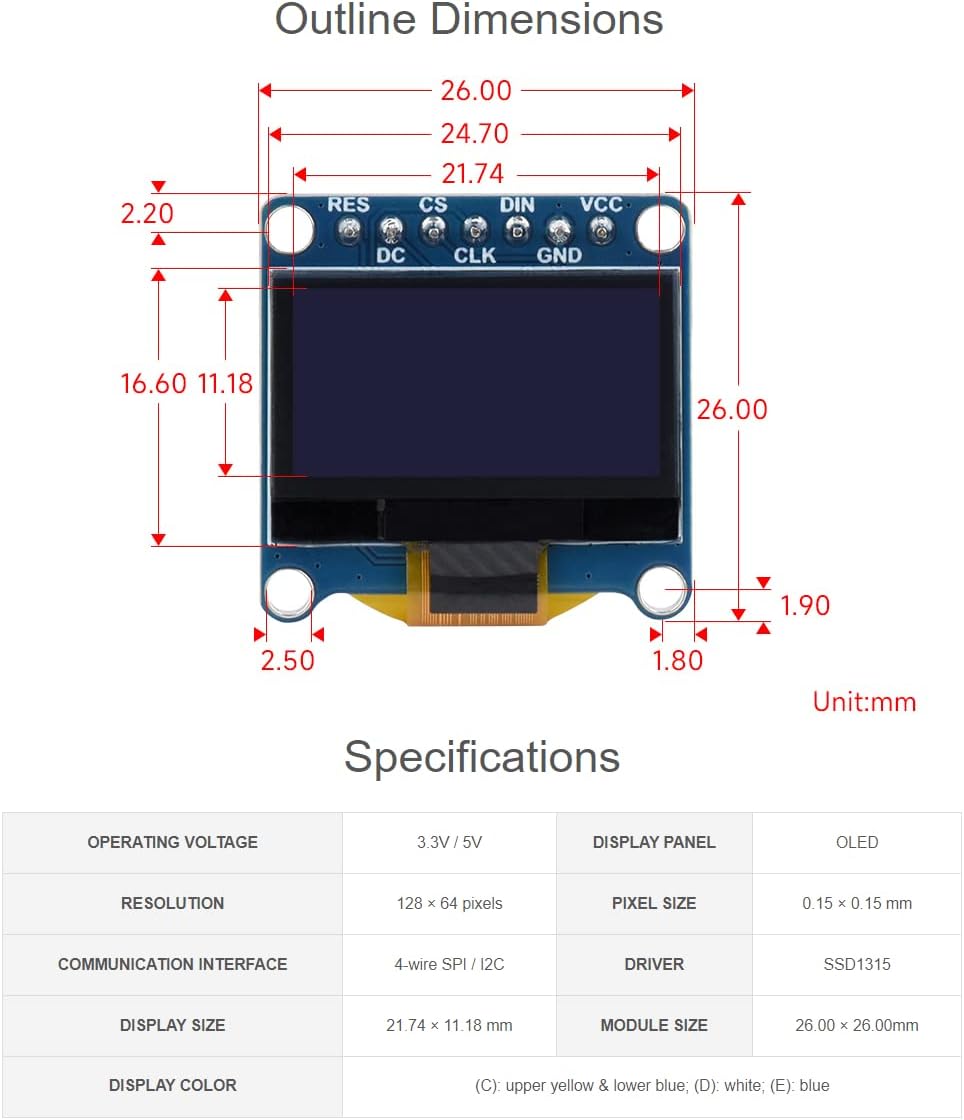
Image: Visual guide demonstrating the correct wiring connections between the 0.96inch OLED module and an STM32 development board.
7. ការពិចារណាលើប្រតិបត្តិការ
To ensure optimal performance and longevity of your OLED module, please observe the following:
- ការតភ្ជាប់ថាមពល៖ Be careful not to reverse the power connection (VCC and GND) as this can damage the module.
- Self-Luminous Display: OLED displays are self-luminous and do not have a backlight. Simply connecting VCC and GND will not illuminate the display. You must use program control to highlight the OLED and display content.
- ការរក្សារូបភាព៖ Avoid displaying the same static screen content for prolonged periods. Continuous display of static images can lead to residual images (burn-in) and potentially damage the OLED panel.
8. ការដោះស្រាយបញ្ហា & សំណួរគេសួរញឹកញាប់
- Q: How many volts can the OLED module be used in a system?
- A: The OLED module is designed for use in a 3.3V system by default. However, extensive testing has shown that it functions reliably in a 5V system as well.
- Q: How many hours does the OLED module last?
- A: Under normal operating conditions, the OLED module typically has a lifespan of approximately 50,000 hours.
- Q: OLED module connected to the power supply why does not light?
- A: OLED displays are self-luminous and do not have a backlight. The display will not light up by simply connecting VCC and GND. You must use program control to initialize the display and send data to illuminate the OLED and show content.
9. ការគាំទ្រ
For further assistance, development resources, or if you encounter any problems, please contact Waveshare support. Online development resources are available to help you get started with your projects.
Visit the official Waveshare store for more information: Waveshare Store
Ask a question about this manual
Ask about setup, troubleshooting, compatibility, parts, safety, or missing instructions. Manuals+ will review the question and use this page’s manual context to help answer it.